Table of Contents
- A Simple Minecraft Storage Room Layout
- 17 Minecraft Storage Categories
- Where to Put Each Category
- How to Build the Storage Room
- Chests, Barrels, Shulker Boxes, or Ender Chests?
- The Best Way to Label Your Storage
- Add a Drop-Off Chest
- Make the Storage Room Look Better
- Small Survival Storage Room
- Medium Storage Room
- Late-Game Storage Room
- Common Minecraft Storage Room Mistakes
- Frequently Asked Questions
- Sources
A good Minecraft storage room gives every group of items a clear home, while leaving enough space for your world to grow. This 17-category layout keeps the blocks you use most around the outside and uses a small center section for Nether, End, Ocean, and miscellaneous items.
- Categories: 17 simple storage groups
- Difficulty: Easy
- Best for: Survival bases and long-term worlds
- Main storage: Chests or barrels
- Upgrade later: Shulker boxes, hoppers, and automatic sorting
A Simple Minecraft Storage Room Layout
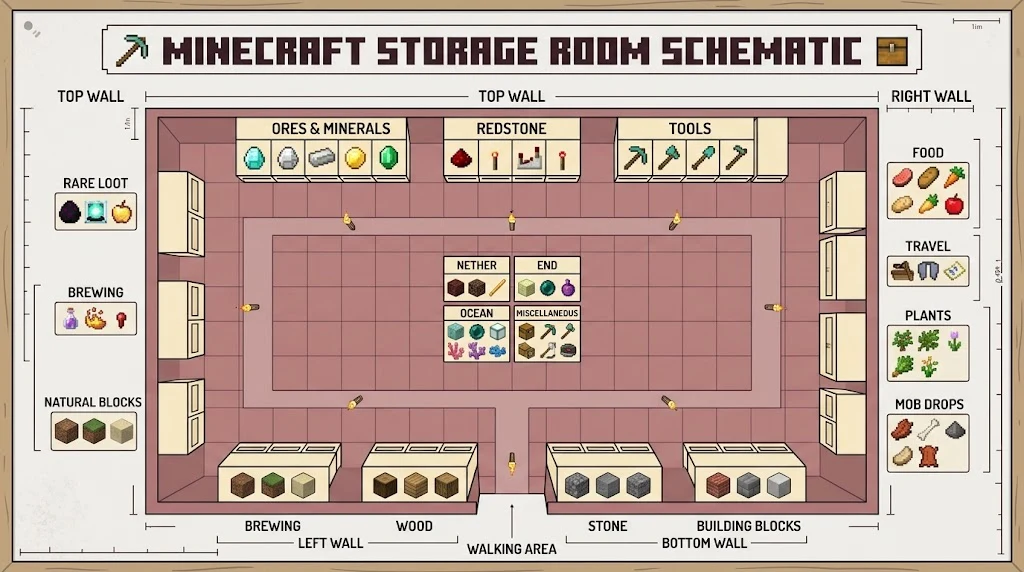
The layout in the inspiration image uses storage around the outside of the room and a smaller island in the center. That is a useful idea because it keeps the main walkway open while giving less common items their own area.
The easiest way to improve the layout is to organize by how often you use each category. Building blocks, wood, stone, tools, food, and redstone should be easy to reach. Dimension-specific items can sit farther from the entrance.
Tip: Do not design the room around the exact number of items you own today. Leave empty chest spaces beside large categories such as stone, wood, building blocks, and mob drops.
17 Minecraft Storage Categories
| Category | What Goes Here | Space Needed |
|---|---|---|
| 1. Ores & Minerals | Coal, iron, copper, gold, diamonds, emeralds, raw ores, ingots | Medium |
| 2. Redstone | Redstone dust, repeaters, comparators, observers, pistons, rails | Medium |
| 3. Food | Cooked food, raw food, bread, fish, golden food items | Medium |
| 4. Travel | Boats, minecarts, saddles, leads, rockets, maps, compasses | Small |
| 5. Plants | Flowers, saplings, seeds, crops, vines, leaves | Medium |
| 6. Mob Drops | Bones, string, rotten flesh, gunpowder, spider eyes, slime | Large |
| 7. Brewing | Potions, bottles, blaze powder, brewing ingredients | Small |
| 8. Rare Loot | Templates, music discs, rare drops, special finds | Small |
| 9. Natural Blocks | Dirt, sand, gravel, clay, mud, snow | Large |
| 10. Stone | Cobblestone, stone, deepslate, granite, diorite, andesite | Very large |
| 11. Wood | Logs, planks, stripped wood, slabs, stairs, fences | Very large |
| 12. Building Blocks | Bricks, concrete, terracotta, glass, decorative blocks | Very large |
| 13. Tools & Gear | Tools, weapons, armor, shields, bows, fishing rods | Medium |
| 14. Nether | Netherrack, soul sand, basalt, blackstone, Nether plants and drops | Medium |
| 15. End | End stone, chorus items, purpur blocks, End loot | Medium |
| 16. Ocean | Prismarine, coral, kelp, sea pickles, shells, aquatic items | Medium |
| 17. Miscellaneous | Items that do not have a clear category yet | Small |
Where to Put Each Category
Near the Entrance
Put the things you use on almost every trip near the door. Tools, food, wood, stone, and building blocks are good candidates.
This makes quick trips much easier. You can drop off mining materials, grab food, replace a tool, and leave without walking around the whole room.
Along the Main Walls
Give your biggest categories long sections of wall space. Stone, wood, natural blocks, building materials, and mob drops tend to grow much faster than specialty categories.
Leave at least one unused container or empty wall position beside each of these groups. Expansion is easier when you plan for it before the room is full.
On the Center Island
A center island works well for smaller groups such as Nether, End, Ocean, and miscellaneous storage.
It can also hold a crafting table, anvil, stonecutter, or a temporary drop-off chest. Keeping utility blocks in the middle means you can reach them from either side of the room.
How to Build the Storage Room
Choose a room with space to expand.
A slightly oversized room is better than rebuilding the whole storage system later.
Mark a wide center walkway.
Leave enough room to move comfortably while opening containers on either side.
Place your largest categories first.
Reserve the longest walls for stone, wood, natural blocks, building blocks, and mob drops.
Add the smaller sections.
Use shorter wall areas for food, redstone, brewing, travel gear, and rare loot.
Build the center island.
Keep it smaller than the outer storage walls so it does not make the room feel cramped.
Label every section.
Use item frames or signs so you can identify a chest without opening it.
Leave empty storage.
Add spare containers before you need them. Your collection will keep growing.
Chests, Barrels, Shulker Boxes, or Ender Chests?
Use Chests for Bulk Storage
Chests are the simplest option for large categories. They work well for stone, wood, dirt, building blocks, food, and mob drops.
A long wall of grouped chests is also easy to expand because you can continue the same pattern as your collection grows.
Use Barrels in Tight Spaces
Barrels are useful when you want storage built directly into a wall or under another block. Minecraft describes barrels as storage blocks that work well in tight spaces.
They also fit naturally into workshop-style rooms because their front texture looks more like part of the wall.
Use Shulker Boxes for Portable Groups
Shulker boxes become especially useful later in a Survival world because they keep their contents when you break and carry them.
That makes them useful for building kits, redstone projects, mining supplies, or any group of items you regularly take away from your base.
Use an Ender Chest for Personal Essentials
An Ender chest works differently from normal room storage. Its contents can be accessed from another Ender chest, even in another dimension.
That makes it useful for valuable tools, backup equipment, rockets, or other items you want available while traveling.
The Best Way to Label Your Storage
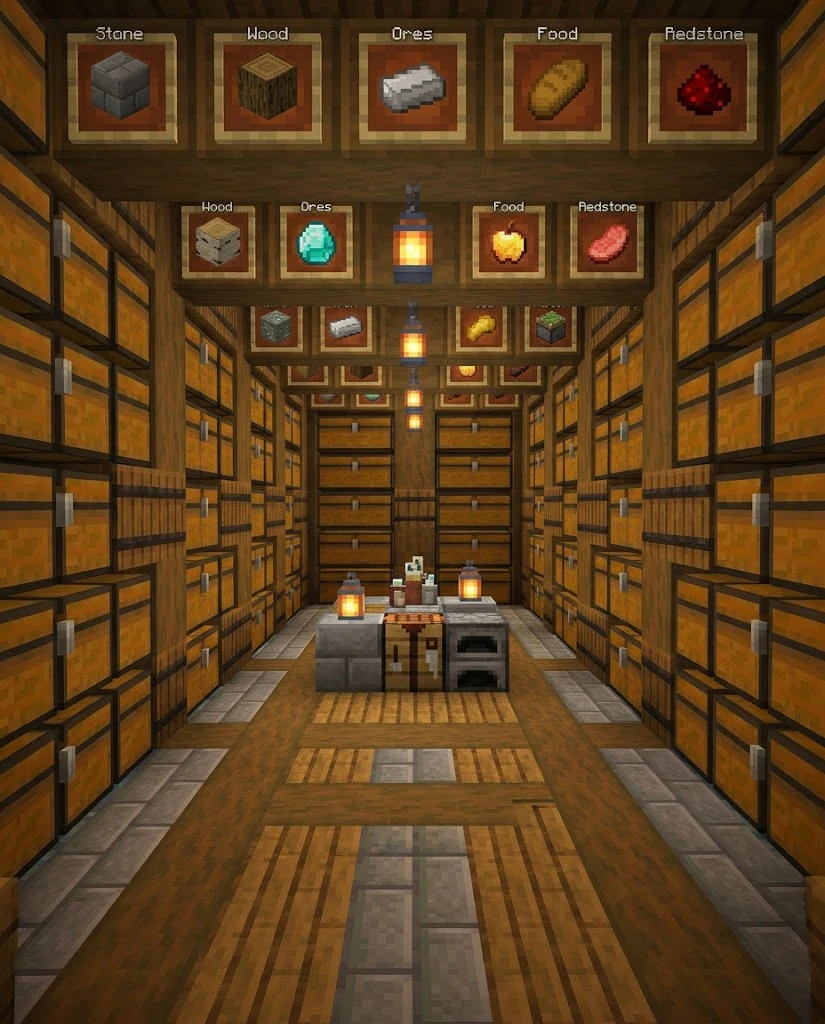
Item frames are one of the fastest systems to read. Put a representative item on the front or above the container.
For example, use an iron ingot for minerals, redstone dust for redstone, a log for wood, or a stone block for stone.
Signs are more useful when a category contains many unrelated items. A simple sign that says “Travel” or “Misc” can be clearer than choosing one item to represent the whole group.
Add a Drop-Off Chest
One of the most useful additions is a temporary unsorted chest near the entrance.
After exploring, mining, or building, empty your inventory into this chest instead of stopping to sort every item immediately. Later, move those items into their permanent categories.
Keep this container separate from the permanent Miscellaneous section. A drop-off chest is temporary. Miscellaneous storage is for items that genuinely do not fit another group.
Make the Storage Room Look Better
An organized room does not have to look like a warehouse. Use a simple floor pattern, repeated wall supports, lighting, and one main material palette.
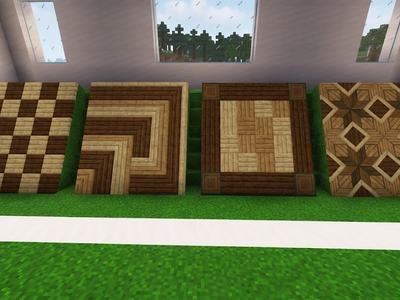
If you want a patterned floor under the storage system, see our Minecraft floor designs for four simple wood layouts that can be expanded to larger rooms.
Try to keep the floor simpler if the walls already contain many chests, signs, and item frames. Too many patterns in one room can make the labels harder to scan.
Small Survival Storage Room
You do not need all 17 sections when your world is new.
Start with six groups:
- Stone and natural blocks
- Wood and building blocks
- Ores and minerals
- Food and plants
- Tools and gear
- Miscellaneous items
Split these into smaller categories when a chest starts becoming difficult to search.
Medium Storage Room
Once you start visiting the Nether, collecting redstone, farming mobs, and building larger projects, move toward the full category system.
This is a good stage to separate wood from general building materials, redstone from ores, and mob drops from natural resources.
Late-Game Storage Room
A late-game base can keep the same category layout while adding more storage behind it.
Shulker boxes are useful for portable project supplies. Hoppers can move items between containers and become the foundation for more advanced sorting systems.
You do not need to automate everything. Automatic sorting is most useful for items you collect in large quantities, while rare or unusual loot is often easier to sort by hand.
Common Minecraft Storage Room Mistakes
- Building too small: Large categories fill much faster than expected.
- Using too many categories early: Empty labeled chests can make a starter base harder to use.
- No expansion space: Leave room beside stone, wood, blocks, and mob drops.
- One giant miscellaneous chest: It quickly becomes another inventory you have to search.
- Labels that are too specific: Broad categories are easier to remember.
- Putting rare storage closest to the door: Give the easiest access to items you use every day.
- No temporary drop-off area: Players often stop sorting entirely when putting away items takes too long.
Frequently Asked Questions
What categories should I use in a Minecraft storage room?
Start with broad groups such as stone, wood, building blocks, ores, food, tools, plants, mob drops, and miscellaneous items. Add redstone, brewing, Nether, End, and other categories as your world grows.
How big should a Minecraft storage room be?
There is no single correct size. Build enough wall space for your current storage and leave several empty sections for future expansion. A storage room that can grow is more useful than one that is perfectly full on the first day.
Should I use chests or barrels?
Use whichever matches your layout. Chests are easy for large grouped storage, while barrels are useful in tight spaces and wall-mounted storage designs.
Where should I store Nether and End items?
A small center island or a dedicated section away from your most-used storage works well because dimension-specific materials are usually accessed less often than stone, wood, food, or tools.
How do I organize a small Minecraft base?
Do not begin with 17 separate sections. Use about six broad groups and split them only when they become difficult to search.
Can I automate this storage room later?
Yes. Hoppers can move items into other containers, so a manual category-based room can later become the front end of a larger sorting system without changing the basic organization.
Sources
Minecraft’s official guides to barrels, shulker boxes, Ender chests, and hoppers were used to check the storage mechanics described in this guide.