Table of Contents
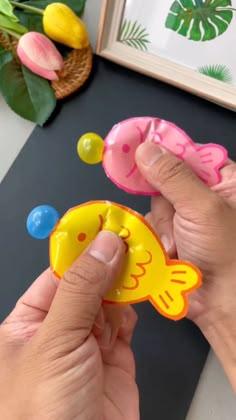
Finding activities that bridge the gap between creative art and active play can sometimes be a challenge for parents and teachers. You want something that engages the imagination but also provides a tactile, hands-on experience that keeps little hands busy. This is where blowing bubbles goldfish paper crafts come into play. These charming little fish are not just static decorations to hang on a fridge; they are interactive toys designed to mimic the whimsical motion of a fish blowing bubbles underwater.
This specific craft is a fantastic way to introduce children to the concepts of shape, color, and simple mechanics. By creating something they can actually “operate,” children feel a sense of accomplishment that goes beyond just coloring a picture. It turns a simple afternoon of arts and crafts into an interactive sensory experience that can provide hours of entertainment.
Why Kids Love Interactive Paper Crafts
Children are naturally drawn to movement. When a child spends time drawing and cutting out a fish, they are practicing fine motor skills. However, when that fish can “blow” a bubble through a simple squeeze or movement, the engagement level skyrockets. This transition from a two-dimensional drawing to a three-dimensional toy is a magical moment in early childhood development.
Interactive crafts like these blowing bubbles goldfish paper crafts serve several developmental purposes. First, they encourage fine motor control as kids handle small pieces of paper, glue, or specialized bubble components. Second, they spark storytelling. Once the fish is “alive” and blowing bubbles, a child is much more likely to create a whole underwater world around it, complete with coral reefs, seaweed, and other sea creatures.
Furthermore, these crafts are highly customizable. Unlike store-bought plastic toys, these paper fish can be any color the child imagines. They can be neon pink, bright sunshine yellow, or even polka-dotted. This freedom of expression is vital for fostering a love for the arts from a young age.
Essential Materials for Your Goldfish Project
While you can adapt this craft to whatever you have in your junk drawer, having a few specific items on hand will make the process much smoother. The goal is to create a durable yet flexible fish that can withstand the “squeezing” or movement required to make the bubbles appear.
- Heavyweight Paper or Cardstock: Regular printer paper might be too flimsy. Using cardstock ensures the fish holds its shape when being handled.
- Brightly Colored Markers or Paint: To give your goldfish its personality, you will need vibrant colors like orange, yellow, pink, and blue.
- Small Plastic Spheres or Bubble Components: Depending on your specific method, you might use small translucent beads, lightweight plastic balls, or even specialized paper-based bubble mechanisms.
- Adhesives: Strong glue sticks or double-sided tape work best for attaching the “bubbles” to the mouth area of the fish.
- Scissors: Safety scissors are a must for younger children to ensure they can cut out the fish shapes independently.
- Optional Decorations: Googly eyes, glitter, or sequins can add that extra bit of “exquisite artwork” flair to your creations.
Step-by-Step Guide to Creating Your Fish
Creating these little sea friends is a straightforward process, but following a logical order helps prevent frustration, especially with younger crafters. Here is a simple way to approach the project.
Step 1: Design and Color
Start by drawing your fish shapes on the cardstock. You don’t need to be a master artist; simple, rounded fish shapes work best. Once the outlines are drawn, let the children go wild with colors. Encourage them to add scales, fins, and big, friendly eyes. This is the most relaxing part of the process where the artistic vision comes to life.
Step 2: Cutting and Shaping
Carefully cut out the fish shapes. If you are working with very young children, this is a great time to assist them or have them trace the lines while you do the heavy cutting. Ensure the mouth area is clearly defined, as this is where the “magic” will happen.
Step 3: Attaching the Bubbles
This is the most important step for the blowing bubbles goldfish paper crafts. Using your adhesive, attach your small spheres or bubble components to the mouth of the fish. If you are using a mechanism that requires a bit of space, ensure the bubble is positioned so it looks like it is emerging directly from the fish’s mouth. This creates the illusion of movement.
Step 4: Final Touches
Add any extra decorations like glitter or googly eyes. Once everything is dry, your goldfish is ready for its first underwater adventure!
Tips for Successful Crafting Sessions
To make the experience as stress-free as possible, keep a few things in mind. First, prepare the workspace. Lay down a tablecloth or newspaper to catch any stray glitter or marker marks. This makes cleanup much easier and allows you to focus on the fun.
Second, encourage patience. Sometimes the glue takes a moment to dry, or the cutting takes longer than expected. Instead of rushing to the finish line, celebrate the small steps. If a child wants to spend twenty minutes just coloring one fin, let them! The process is just as important as the final product.
Third, think about the “play” aspect. Once the crafts are finished, set up a “blue paper ocean” on the floor or table. This provides a dedicated space for the kids to play with their new blowing bubbles goldfish paper crafts, preventing them from wandering around the house with potentially messy or delicate creations.
Frequently Asked Questions
Can I use different types of paper?
Yes, but cardstock is highly recommended. If the paper is too thin, the fish will bend and lose its shape quickly during play. If you only have thin paper, you can glue two layers together to add strength.
What if the bubbles fall off?
If the bubbles are falling off, you may need a stronger adhesive like tacky glue or a small piece of double-sided foam tape. Foam tape is particularly good because it adds a little bit of depth and “bounce” to the bubble.
Is this craft suitable for toddlers?
This craft is best for children aged 4 and up, primarily due to the use of scissors and small parts (the bubbles) which could pose a choking hazard. For toddlers, it is best to do the cutting and small part attachment for them while they focus on the coloring.
Conclusion
Engaging in creative activities like making blowing bubbles goldfish paper crafts is a wonderful way to support a child’s growth while providing a moment of pure, imaginative joy. These little fish are more than just paper and glue; they are tools for storytelling, fine motor development, and artistic expression. Whether you are a parent looking for a rainy-day activity or a teacher planning a classroom project, these interactive goldfish are sure to bring a splash of color and excitement to your day. So, grab your markers, find your glitter, and get ready to dive into a world of underwater fun!