Table of Contents
- Gathering Your Outdoor Treasures
- Preparing Your Nature Craft Station
- Designing a Leaf Butterfly
- Crafting a Stone and Leaf Snail
- Tips for Preserving Your Nature Art
- Conclusion
- Frequently Asked Questions
- What types of glue work best for heavy natural items?
- Can I use fresh leaves or should they be dried first?
- Where is the best place to find materials for this craft?
Connecting with the outdoors through simple creative projects brings a special kind of joy to quiet afternoons. When you step outside and look closely at the ground, you start to notice incredible textures, shapes, and colors hiding in plain sight. Fallen leaves, smooth stones, tiny twigs, and bright flower petals all wait patiently for a new purpose. Transforming these outdoor finds into lasting art pieces lets you capture the fleeting beauty of the changing seasons.
Working on a nature collage butterfly and snail craft is a wonderful way to encourage imaginative thinking while exploring the local environment. Instead of relying on traditional art supplies from a store, you get to hunt for natural treasures right in your backyard, local park, or neighborhood walking path. This hands-on activity invites both children and adults to slow down, observe tiny details in nature, and turn everyday outdoor elements into charming animal portraits.
Gathering Your Outdoor Treasures
The first step in any outdoor art adventure begins outside with a simple walk. Take a small basket, tray, or cloth bag with you as you explore. Keep your eyes open for items that offer interesting visual contrast. You might look for deep green leaves, golden autumn foliage, or crisp red leaves that add rich pops of color to your collection.
As you collect materials, try to find a balanced variety of shapes and sizes. Small white stones or pebbles work wonderfully for creating rounded spiral patterns. Thin twigs can double as antennae, while delicate flower petals bring soft pastel tones and whimsical details to your finished designs. Always practice mindful foraging by picking up items that have already fallen naturally to the ground rather than pulling living plants from their stems.
Preparing Your Nature Craft Station
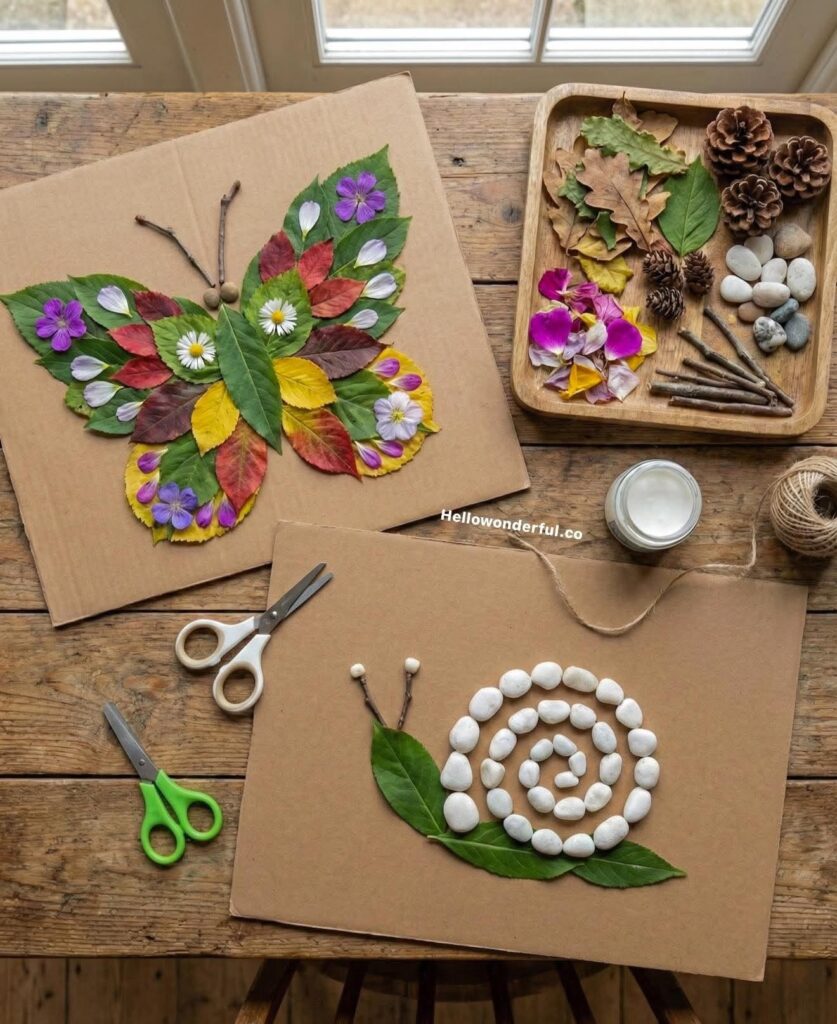
Once you return indoors or set up a comfortable workspace outside on a wooden table, lay out all your collected treasures in an organized way. A compartmentalized wooden tray or a few small bowls help keep leaves, stones, and pinecones separated. Having everything visible makes the design process much smoother and more inspiring.
For your base, sturdy cardboard cut into clean squares or rectangles works exceptionally well. The neutral brown tone of cardboard provides a wonderful rustic background that makes the vibrant colors of leaves and white stones stand out clearly. Keep a bottle of reliable craft glue, a piece of twine, and a pair of scissors nearby just in case you need to trim any stubborn stems or secure loose pieces.
Designing a Leaf Butterfly
Creating a winged insect using foliage requires careful arrangement and a bit of patience. Begin by selecting a few larger leaves to serve as the main backdrop for your butterfly wings. Layer them carefully on your cardboard base, angling them outward to create a sense of symmetry and motion.
Next, fill in the inner sections of the wings using smaller leaves and petals in contrasting colors. You can place bright purple flowers and cheerful white daisies near the center or edges to create striking patterns. Use slender twigs for the butterfly’s antennae, topping them with tiny seeds or small round pebbles to finish the delicate head details.
Crafting a Stone and Leaf Snail
After finishing your winged creation, switch your focus to a slower-paced creature. A whimsical snail provides a fantastic opportunity to experiment with geometric shapes and textures. Start by choosing a long, smooth green leaf to form the body and soft foot of the snail resting at the bottom of your cardboard sheet.
To build the iconic shell, arrange a collection of smooth white pebbles in a tight, curving spiral pattern. Start from the very center and work your way outward until you form a neat dome shape that sits comfortably on top of the leaf body. Add two short twigs with tiny bud ends at the front of the leaf to complete the friendly snail expression.
Tips for Preserving Your Nature Art
Natural materials change over time as they dry out, but you can take a few simple steps to help your creations last longer. Apply a generous layer of craft glue beneath each leaf and stone to ensure everything stays securely attached to the sturdy cardboard base once the glue dries completely.
If you want to keep your seasonal artwork displayed on a wall, consider framing it behind glass without pressing the plants too flat, or gently press your favorite leaves in a heavy book for a few days before gluing them down. Taking high-resolution photographs of your finished pieces also ensures you have a permanent digital memory of your outdoor crafting session.
Conclusion
Embracing outdoor creativity through a nature collage butterfly and snail craft offers a refreshing break from screens and structured indoor routines. By combining simple cardboard bases with leaves, stones, and twigs found right outside your door, you can create delightful artwork full of personal character. Head outside today, gather your favorite outdoor finds, and see what wonderful creatures you can bring to life.
Frequently Asked Questions
What types of glue work best for heavy natural items?
Standard white craft glue works well for lightweight leaves and petals, but slightly heavier items like small stones and thick twigs may require a quick-drying tacky glue or a hot glue gun used with adult supervision.
Can I use fresh leaves or should they be dried first?
Fresh leaves are flexible and easy to arrange, but they will eventually curl and change color as they dry. If you want your artwork to retain its exact look for a long time, press your leaves in a heavy book for a week before gluing them.
Where is the best place to find materials for this craft?
Local parks, backyard gardens, neighborhood sidewalks, and wooded walking trails are fantastic places to spot fallen leaves, interesting twigs, small pebbles, and scattered pinecones.