Table of Contents
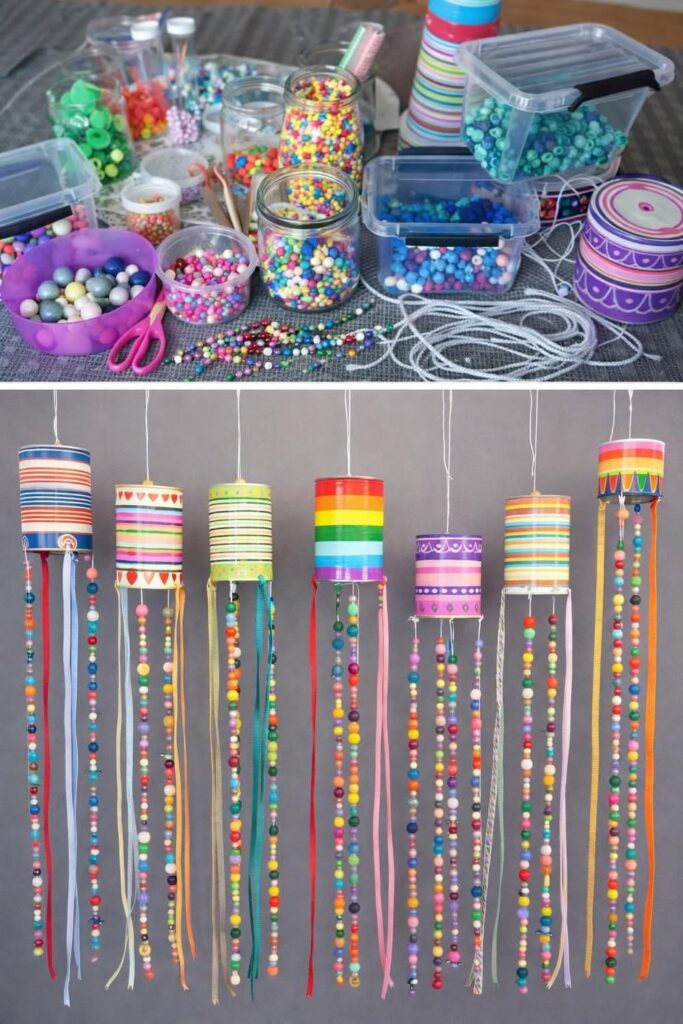
There is something undeniably magical about the simple act of threading a bead onto a string. It is a timeless activity that has captivated children for generations, offering a perfect blend of creativity, patience, and tactile fun. When you look at a vibrant collection of supplies—jars overflowing with colorful pony beads, spools of ribbon, and scissors ready for action—you see the potential for endless imagination. These beaded craft projects for kids are not just about making jewelry; they are about creating functional art, like the beautiful hanging wind chimes shown here, that can brighten up a room and a child’s day.
The Joy of Tactile Creativity
Engaging in hands-on activities is crucial for child development. Beading, in particular, offers a unique sensory experience. The smooth texture of wooden beads, the cool feel of plastic pony beads, and the soft drape of ribbons provide a rich sensory input that keeps children focused. Unlike screen-based entertainment, these crafts require physical interaction, helping to ground the child in the present moment.
Furthermore, the visual appeal of these projects is immediate. Children love seeing their efforts come together into something tangible and beautiful. Whether it is a simple bracelet or a complex hanging decoration, the sense of accomplishment is real. The image above highlights this perfectly, showing a transition from a chaotic but organized pile of supplies to a stunning display of finished wind chimes. This transformation teaches children that effort leads to a rewarding result.
Gathering Your Craft Supplies
Before diving into the project, it is helpful to organize your materials. As seen in the top portion of the image, a well-stocked craft station makes the process smoother and more enjoyable. You do not need expensive equipment to get started. In fact, many of the best materials can be found around the house or at a local dollar store.
- Assorted Beads: A mix of sizes and textures is ideal. Wood beads add a natural touch, while plastic pony beads offer bright, bold colors. Larger beads are easier for younger children to handle.
- Ribbons and Cords: Look for various widths and patterns. Satin ribbons, grosgrain, and simple cotton cords all work well. The length should be generous to allow for long, flowing strands.
- Cardboard Tubes: Empty toilet paper rolls or paper towel tubes serve as the perfect base for wind chimes. They are lightweight, easy to decorate, and eco-friendly.
- Adhesives: Glue sticks, liquid craft glue, or double-sided tape are essential for attaching ribbons to the tubes.
- Scissors: Child-safe scissors are a must for cutting ribbons and strings to the desired length.
- Decorative Elements: Washi tape, markers, or paint can be used to decorate the cardboard tubes before adding the beads.
Step-by-Step: Creating Beaded Wind Chimes
One of the most delightful beaded craft projects for kids is making hanging wind chimes. This project combines structural creativity with the fine motor skills required for beading. It is a fantastic way to use up leftover beads and ribbons while creating a lasting piece of home decor.
1. Decorate the Base
Start by preparing the cardboard tubes. This is the canvas for your creation. You can wrap the tubes in colorful washi tape, paint them with bright acrylics, or draw patterns with markers. In the example image, you can see tubes decorated with stripes, hearts, and rainbows. This step allows children to express their artistic side before the intricate work begins.
2. Prepare the Hanging Strings
Cut several lengths of ribbon or cord. The length will depend on how long you want your wind chime to hang. For a standard chime, strands ranging from 12 to 18 inches work well. If you are using ribbons, you can leave them plain or thread beads onto them first. Threading beads onto flat ribbons can be tricky for very young children, so pre-threading or using thicker cords might be necessary for beginners.
3. Assemble the Chime
Once your beads are threaded, it is time to attach the strands to the tube. You can glue the tops of the ribbons to the bottom of the decorated tube. Ensure they are spaced evenly around the circumference. For a more secure attachment, you can poke small holes near the bottom edge of the tube and thread the ribbons through, tying them off on the inside.
4. Add the Hanging Loop
Finally, create a loop at the top of the tube to hang your creation. You can use a piece of string, a ribbon, or even a paperclip bent into a hook shape. Attach this securely to the top center of the tube. Now, your wind chime is ready to dance in the breeze!
Tips for Success with Young Crafters
Working with small items like beads can be challenging for little hands. Here are some tips to ensure a smooth and enjoyable crafting session:
- Sort the Beads: Before starting, have your child sort the beads by color or size. This adds an extra layer of learning and makes it easier to find the right bead when they need it.
- Use a Bead Mat: Working on a textured surface, like a towel or a specialized bead mat, prevents beads from rolling away. This is a crucial tip for maintaining sanity during the project.
- Start with Large Beads: If your child is new to beading, start with large wooden beads or pasta shapes. These are easier to grasp and thread, building confidence before moving to smaller pony beads.
- Pre-Cut Materials: For younger children, pre-cutting the ribbons and cords can save time and frustration. They can focus on the creative aspect of choosing colors and threading.
Safety First
While beading is a wonderful activity, safety should always be a priority. Small beads pose a choking hazard for children under three years old. Always supervise young children closely and ensure they understand not to put the beads in their mouths. Additionally, teach children how to use scissors safely, guiding their hands if necessary. Keep the craft area clean and organized to prevent tripping hazards from scattered supplies.
FAQ
What age is appropriate for beading?
Children as young as four or five can start with large beads and thick cords. As their fine motor skills develop, they can move on to smaller beads and thinner strings. Always supervise children under eight.
Can I use materials other than cardboard tubes?
Absolutely! You can use empty plastic bottles, tin cans (with edges smoothed), or even wooden blocks. The possibilities are endless, and using recycled materials adds an eco-friendly element to the craft.
How do I store my beads?
Clear plastic containers with lids, like the ones shown in the image, are perfect for storage. You can also use small jars, egg cartons, or compartmentalized boxes to keep different colors and sizes organized.
Conclusion
Crafting is more than just a pastime; it is a valuable learning tool that fosters creativity, patience, and fine motor skills. These beaded craft projects for kids offer a perfect opportunity to engage children in a meaningful activity that results in a beautiful, tangible product. Whether you are making simple bracelets or elaborate wind chimes, the process is just as rewarding as the final product. So, gather your supplies, set up a cozy craft station, and let your child’s imagination run wild with colors and patterns. The joy of creating something with their own hands is a gift that lasts long after the glue has dried.