Table of Contents
- Gathering Simple Supplies for Your Parrot Craft
- Preparing the Base and Body Structure
- Adding Vibrant Feathers and Wings
- Crafting Bendable Legs and Perches
- Frequently Asked Questions
- What age group is best suited for this parrot craft?
- Can I substitute traditional paper mache paste for this project?
- How can we display these finished bird crafts?
Crafting with children offers a wonderful opportunity to slow down, share stories, and create something unique together using ordinary household supplies. When you want an engaging project that keeps little hands busy, making DIY paper mache parrots for kids is a fantastic choice that combines recycling with imaginative play. Not only do these colorful tropical birds bring a splash of jungle brightness into your home, but the crafting process itself helps children develop fine motor skills, patience, and creative confidence. Whether you are planning a rainy day activity, a weekend art project, or an educational unit about rainforest animals, these cheerful birds will capture every child’s attention.
The beauty of this crafting project lies in its simplicity and adaptability. You do not need expensive specialty items to get started; instead, you can look around your home for cardboard tubes, scraps of colorful paper, textured feathers, and simple adhesives. Kids love transforming plain cardboard shapes into vibrant creatures with big expressive eyes and feathered wings. As they design their own individual parrots, children can experiment with different color combinations, patterns, and accessories, ensuring that no two birds look exactly alike.
Gathering Simple Supplies for Your Parrot Craft
Before you invite your little ones to the crafting table, it helps to organize all your materials in one accessible spot. Having everything ready prevents interruptions and keeps the creative momentum going strong once the crafting begins. You will want to look for basic items that are safe and easy for children to handle under adult supervision.
Here is a helpful checklist of supplies you will likely need to bring your parrots to life:
- Sturdy cardboard tubes or recycled cylinders to serve as the main body structure.
- Assorted colored papers, including bright blues, greens, whites, and yellows for feathers and beaks.
- Textured feathers or paper cutouts to create wings, crests, and tail plumage.
- Googly eyes or white and black paper circles to give the birds a friendly expression.
- Pipe cleaners in matching shades for bendable legs and claws.
- Kid-safe glue, double-sided tape, or paste for securing each piece in place.
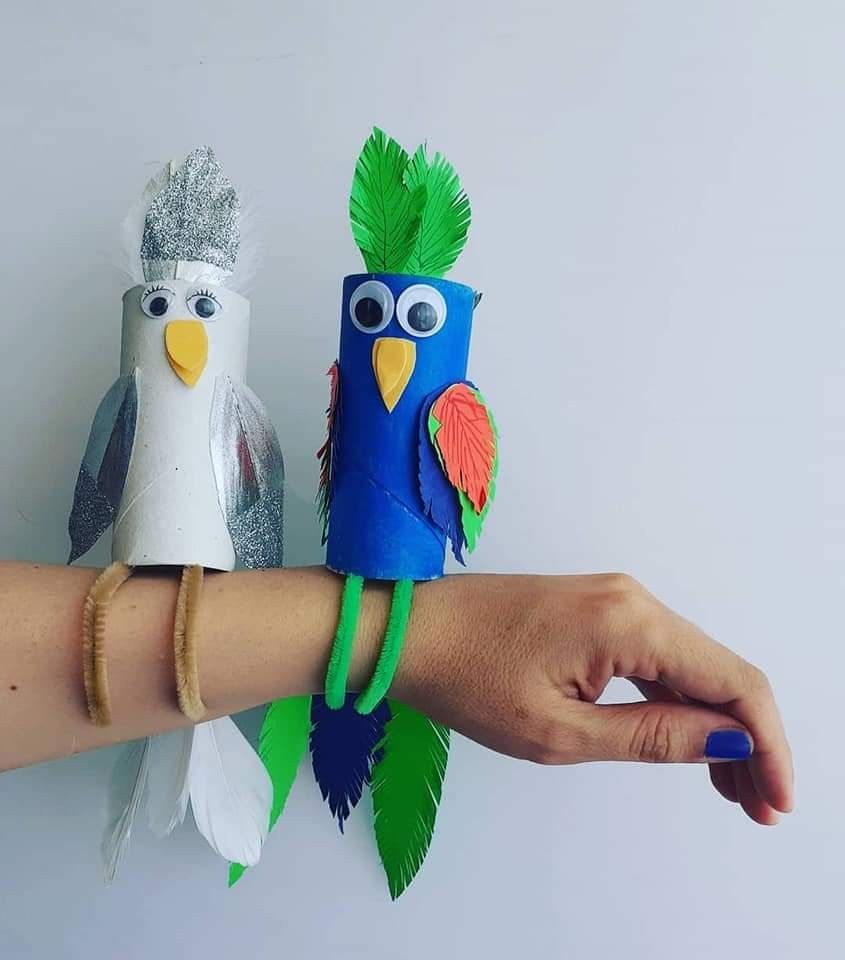
Encourage children to select their own favorite colors from your supply box. If a child wants to make a bright blue parrot with green crest feathers or a silver-and-white snowy bird with sparkly accents, let their imagination guide the design choices. Personalization makes the final artwork feel much more rewarding for young creators.
Preparing the Base and Body Structure
The foundation of your bird begins with a simple cardboard cylinder, which provides a sturdy body that is easy to decorate. If you are using plain brown or grey cardboard tubes, you can start by wrapping them in colored paper or painting them with washable acrylics. Let the base layer dry completely before moving on to the finer details so that the structure remains neat and easy to hold.
Once the main body cylinder is fully covered in its primary color, children can focus on adding facial features. Position the googly eyes near the upper portion of the tube, leaving enough space above for a distinctive head crest. A cheerful expression instantly brings personality to the craft, turning a simple cardboard tube into a lively character ready for an adventure.
Next comes the iconic curved beak, which gives parrots their recognizable look. You can cut a simple triangle or diamond shape out of yellow or orange paper, fold it slightly down the center to create a three-dimensional effect, and glue it securely right below the eyes. This simple folding technique adds wonderful depth to the flat paper elements and makes the bird pop out visually.
Adding Vibrant Feathers and Wings
Parrots are famous for their breathtaking plumage, so this step is where the real magic happens. Children can cut out wing shapes from contrasting paper colors, adding small fringe cuts along the edges to mimic the texture of real feathers. Layering different shades, such as adding orange and red accents onto blue wings, mimics the natural beauty of tropical birds.
For the head crest, a cluster of pointy paper feathers or textured plumes glued to the top of the cylinder adds height and dramatic flair. Encourage children to experiment with height and angles, letting some feathers stand straight up while others curve gently backward. Tail feathers attached to the bottom rear of the tube complete the silhouette, giving the bird a balanced and authentic look.
If you want to add extra sparkle or tactile variety, consider offering glitter glue, metallic foil scraps, or soft fabric bits. Kids thoroughly enjoy mixing textures, and a little bit of shimmer on the wings or crown makes their handmade parrots stand out brilliantly on display or during playtime adventures.
Crafting Bendable Legs and Perches
To finish your DIY paper mache parrots for kids, you will want to add functional elements that allow for interactive play. Pipe cleaners make exceptional legs because they are wonderfully flexible and easy to attach inside the bottom opening of the cardboard cylinder. Children can bend and twist the fuzzy wire to form small feet or claws.
These bendable legs mean the finished birds can easily perch on wrists, branches, or backpack straps, turning a static art project into a wearable companion. Kids love showing off their creations by wearing them around the house or acting out imaginative stories where their feathered friends fly through jungle canopies.
Take time to help younger children secure the pipe cleaner legs firmly on the inside of the cylinder with sturdy tape or strong glue so they do not pull out during enthusiastic play. Once the legs are secure, test the balance to ensure your bird sits or perches steadily without tipping over.
Frequently Asked Questions
What age group is best suited for this parrot craft?
This project is wonderfully adaptable for children aged four and up. Younger children will need assistance with cutting shapes and handling strong adhesives, while older kids can independently design, cut, and assemble their parrots from start to finish.
Can I substitute traditional paper mache paste for this project?
Yes, if you prefer a quicker method without traditional messy paper mache paste, using cardboard tubes and layered paper construction achieves a very similar decorative result with much less drying time and cleanup.
How can we display these finished bird crafts?
Children can display their completed parrots on bedroom shelves, attach them to indoor potted plant branches for a jungle vibe, or use the bendable pipe cleaner legs to wear them as fun wrist companions during imaginative play.
Engaging in creative activities like making DIY paper mache parrots for kids fosters a lifelong love for arts and handicrafts while turning everyday recyclables into treasured toys. By combining simple materials with boundless imagination, you create an afternoon full of laughter, learning, and colorful memories that your family will cherish.