Table of Contents
- Why You'll Love These Sugar Swirl Cookies
- Ingredients & Smart Swaps
- Step-by-Step Cooking Guide
- Chef's Secrets for Success
- Troubleshooting & Common Mistakes
- Storage, Make-Ahead & Reheating
- Frequently Asked Questions
- Can I use a different color food coloring?
- Do I have to chill the dough for 4 hours?
- Can I make these cookies gluten-free?
- How do I get the swirl to stay tight?
- Sugar Swirl Cookies
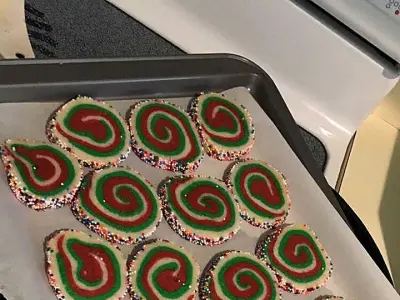
There's something magical about a cookie that looks as good as it tastes. These sugar swirl cookies are proof: a tender, buttery dough wrapped around a bright colored swirl, then rolled in sprinkles for a crunchy, festive finish. One bite and you'll understand why they disappear fast.
I love this recipe because it's incredibly forgiving. You make two simple doughs, roll them together, chill, slice, and bake. No cookie cutters, no royal icing, no stress. The result is a bakery-worthy cookie that's perfect for holidays, bake sales, or a cozy weekend treat. And the best part? The dough freezes beautifully, so you can bake fresh cookies anytime.
Why You'll Love These Sugar Swirl Cookies
- Soft and buttery: The texture is tender and melt-in-your-mouth, thanks to softened butter and just the right amount of flour.
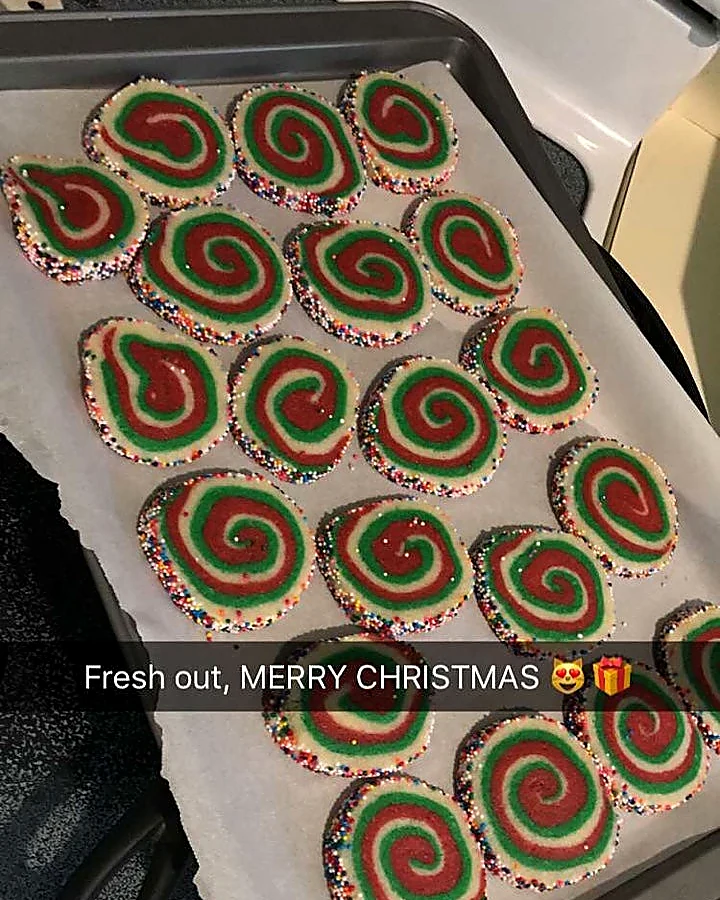
- Visually stunning: The red swirl and sprinkle coating make these cookies look fancy, but they're surprisingly easy.
- Make-ahead friendly: The dough chills for at least 4 hours (or up to 3 days), so you can bake when it's convenient.
- Customizable: Use any food coloring you like—red for Christmas, pastel for Easter, or team colors for game day.
- Kid-friendly: Little hands love rolling the dough in sprinkles and pressing the slices onto the baking sheet.
Ingredients & Smart Swaps
Here's what you'll need to make these sugar swirl cookies. The ingredients are simple pantry staples, but each one plays a role in the final texture and flavor.
- Butter (8 tablespoons, softened): Use unsalted butter for the best control over salt. If you only have salted, reduce the added salt to ¼ teaspoon. Make sure it's truly soft—room temperature for about 30 minutes—so it creams properly.
- Granulated sugar (1 cup): Regular white sugar gives the cookies a crisp edge and soft center. Don't substitute with brown sugar, which would change the texture.
- Egg (1 large): Binds the dough and adds moisture. Let it come to room temperature before mixing.
- Vanilla extract (½ teaspoon): Pure vanilla is best, but imitation works in a pinch.
- Salt (½ teaspoon): Balances the sweetness and enhances flavor.
- All-purpose flour (1½ cups): Spoon and level the flour—don't scoop directly from the bag, or you'll pack it in and get dry cookies.
- Red food coloring (½ teaspoon): Gel or liquid both work. Gel gives a more intense color with less liquid. Feel free to swap for any color you like.
- Sprinkles (about ½ cup): Use jimmies or nonpareils. Avoid coarse sanding sugar, which won't stick as well.
Pro-Tip: For the brightest swirl, use gel food coloring and mix it into the dough until completely uniform. Liquid coloring can make the dough sticky, so add it gradually.
Step-by-Step Cooking Guide
Making these cookies is a straightforward process, but a few key steps ensure success. Follow along and pay attention to the sensory cues.
- Cream the butter and sugar. In a large bowl, beat the softened butter and sugar with an electric mixer on medium speed until light and fluffy, about 2–3 minutes. You'll see the mixture pale in color and increase in volume. Scrape down the bowl.
- Add the egg, vanilla, and salt. Beat until well combined. The mixture should look smooth and glossy.
- Mix in the flour. Add the flour all at once and mix on low speed just until no dry streaks remain. Overmixing develops gluten and makes the cookies tough. The dough will be soft but not sticky.
- Divide and color. Form the dough into a ball, then cut it in half. Add the red food coloring to one half and knead it in with your hands (or mix with a spatula) until the color is evenly distributed. Wear gloves if you want to avoid stained hands.
- Roll out the rectangles. On a large cutting board covered with plastic wrap, roll each dough half into a 12×9-inch rectangle, about ¼ inch thick. Place a piece of wax paper over the dough to prevent sticking to the rolling pin. If the dough feels too soft, chill it for 10 minutes before rolling.
- Layer the doughs. Carefully lift the colored rectangle and place it on top of the plain rectangle. Press down gently to adhere.
- Roll into a log. Starting from one long side, use the plastic wrap underneath to help you roll the dough into a tight cylinder. Roll slowly and evenly, pressing out any air pockets.
- Coat in sprinkles. Pour sprinkles into a flat dish or baking pan. Roll the dough log in the sprinkles until the outside is completely coated. Press gently so they stick.
- Chill. Wrap the log tightly in plastic wrap and refrigerate for at least 4 hours, or up to 3 days. Chilling firm up the dough so it slices cleanly.
- Preheat and slice. When ready to bake, preheat the oven to 375°F (190°C). Line baking sheets with parchment paper. Unwrap the chilled dough and slice into ¼-inch rounds. Place them 1 inch apart on the prepared sheets.
- Bake. Bake for 8–10 minutes, until the edges are just set and the bottoms are lightly golden. The centers will still look soft—that's perfect. Let them cool on the baking sheet for 5 minutes, then transfer to a wire rack to cool completely.
Pro-Tip: For clean, even slices, use a sharp knife and wipe it clean between cuts. If the dough becomes too soft while slicing, pop it back in the fridge for 10 minutes.
Chef's Secrets for Success
- Don't overbake. Pull the cookies when the edges are set but the centers are still soft. They'll continue to firm up as they cool. Overbaked cookies lose that melt-in-your-mouth texture.
- Chill thoroughly. The 4-hour chill is non-negotiable. It prevents the cookies from spreading too much and makes slicing easy.
- Use room-temperature ingredients. Softened butter and a room-temperature egg blend more smoothly, creating a uniform dough.
- Press the sprinkles on firmly. Gently roll the log and press the sprinkles into the dough so they don't fall off after baking.
Troubleshooting & Common Mistakes
- Dough too crumbly? Add a teaspoon of milk or water until it holds together. This can happen if the flour is packed too densely.
- Cookies spreading too much? The dough wasn't chilled enough, or the butter was too warm. Chill the sliced cookies for 10 minutes before baking.
- Swirl not visible? Roll the dough tightly and make sure the colored layer is evenly thick. Also, slice with a sharp knife to avoid smearing.
- Sprinkles falling off? Press them into the dough gently before chilling. You can also brush the log with a little water before coating.
Storage, Make-Ahead & Reheating
Store baked cookies in an airtight container at room temperature for up to 5 days. For longer storage, freeze baked cookies in a zip-top bag for up to 3 months. To freeze the dough, wrap the log tightly in plastic wrap and then foil, and freeze for up to 2 months. Slice and bake from frozen, adding 1–2 minutes to the bake time.
To refresh cookies that have softened too much, pop them in a 300°F oven for 3–5 minutes. They'll crisp up nicely.
Frequently Asked Questions
Can I use a different color food coloring?
Absolutely! Swap the red for green, blue, pink, or any color you like. Gel coloring gives the most vibrant results.
Do I have to chill the dough for 4 hours?
Yes, the chill is important for texture and sliceability. If you're short on time, you can freeze the log for 1 hour, but the cookies may spread slightly more.
Can I make these cookies gluten-free?
You can substitute a 1:1 gluten-free flour blend, but the texture may be slightly different. Look for a blend that contains xanthan gum.
How do I get the swirl to stay tight?
Roll the dough firmly and evenly, and make sure the dough is cold when you slice. A sharp knife also helps prevent squishing.
Dessert • American
Sugar Swirl Cookies
★★★★★
4.9
(42 reviews)
Soft, buttery sugar cookies with a colorful swirl and sprinkle coating. Easy slice-and-bake recipe perfect for holidays and parties.
🛒 Ingredients
- ✓8 tablespoons unsalted butter, softened
- ✓1 cup granulated sugar
- ✓1 large egg
- ✓½ teaspoon vanilla extract
- ✓½ teaspoon salt
- ✓1½ cups all-purpose flour
- ✓½ teaspoon red food coloring
- ✓½ cup sprinkles
📋 Step-by-Step Instructions
-
1In a large bowl, beat butter and sugar until light and fluffy, about 2-3 minutes.
-
2Mix in egg, vanilla, and salt until well combined.
-
3Add flour and mix on low speed just until no dry streaks remain.
-
4Divide dough in half. Add red food coloring to one half and knead until evenly colored.
-
5On a plastic wrap-covered surface, roll each dough half into a 12×9-inch rectangle.
-
6Place colored rectangle on top of plain rectangle. Press gently to adhere.
-
7Roll up tightly from the long side using the plastic wrap to help.
-
8Coat the log completely in sprinkles.
-
9Wrap and chill for at least 4 hours.
-
10Preheat oven to 375°F (190°C). Slice dough into ¼-inch rounds and place on baking sheets.
-
11Bake for 8-10 minutes until edges are set and bottoms lightly golden.
-
12Cool on baking sheet for 5 minutes, then transfer to wire rack.