Table of Contents
- What Are Dirt Cups?
- Before You Start: Three Tips for Better Layers
- 1. Strawberry Cheesecake Dirt Cups
- 2. Blue Raspberry Galaxy Cups
- 3. Peanut Butter Brownie Crunch Cups
- 4. Watermelon Sour Candy Cups
- Which Dirt Cup Flavor Should You Make?
- Can You Make Dirt Cups Ahead of Time?
- How to Store 4 Crazy Dirt Cup Recipes You Need to Try
- Common Dirt Cup Problems
- Frequently Asked Questions
- Sources and Food Safety
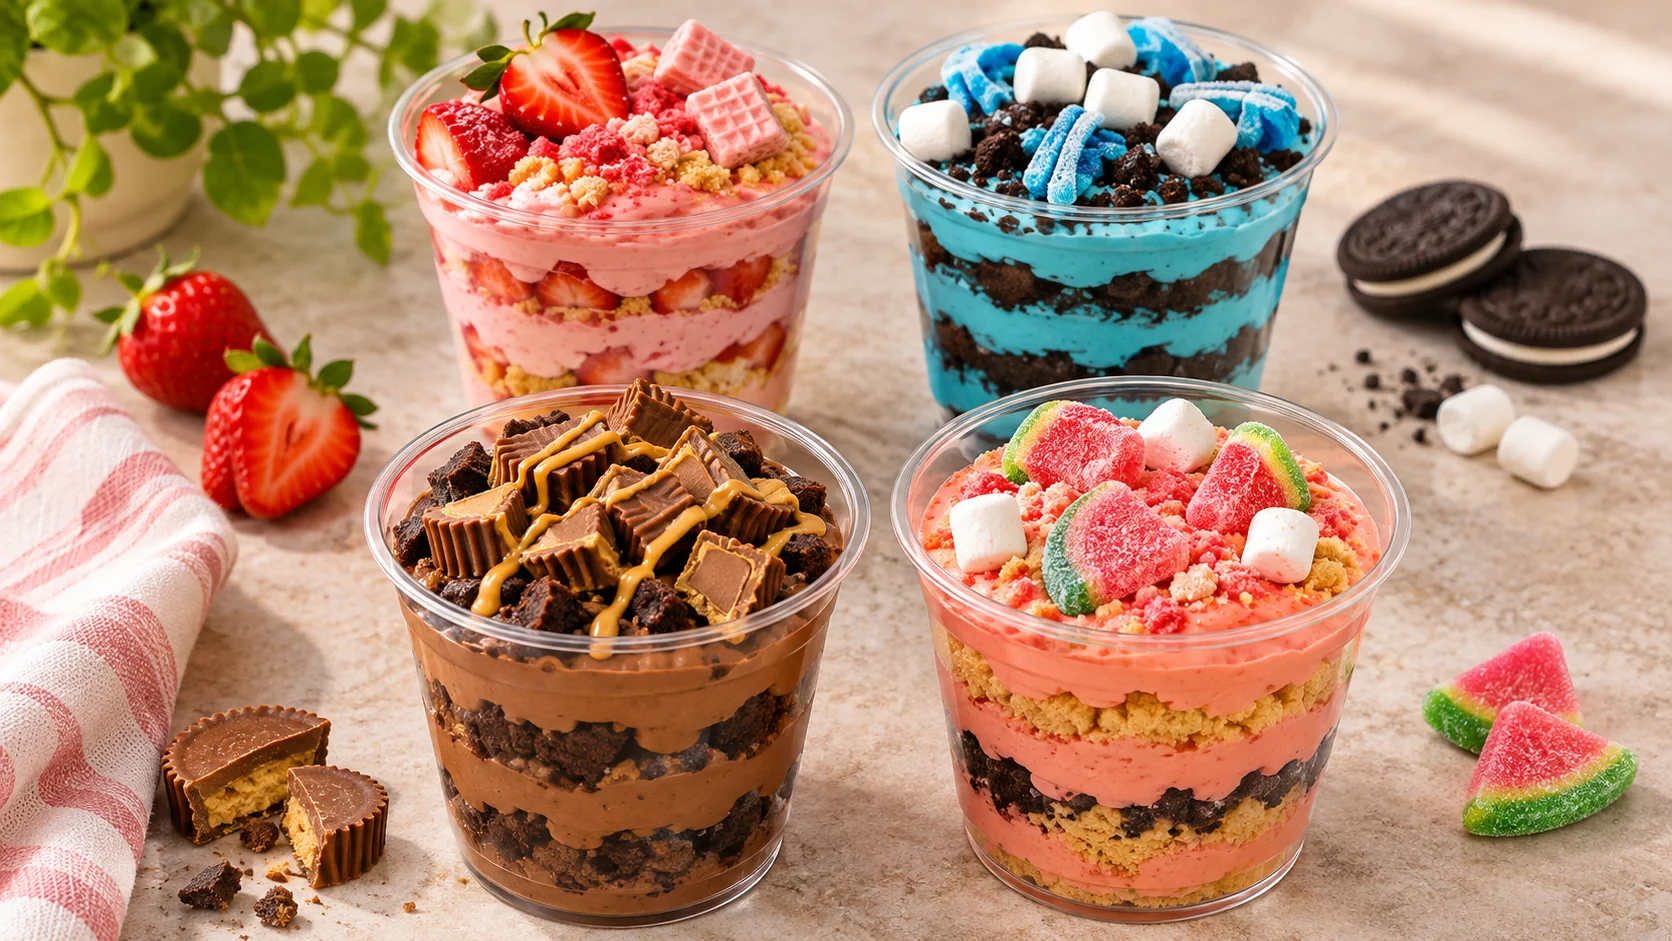
These four dirt cup recipes turn instant pudding, cookie crumbs, and colorful candy into fun no-bake desserts. Try strawberry cheesecake, blue raspberry galaxy, peanut butter brownie crunch, or watermelon candy. Each flavor has its own ingredient list, so you can make just one batch or serve all four at a party.
- Prep time: About 15–25 minutes per flavor
- Chill time: 30–60 minutes
- Yield: Four 8-ounce cups per flavor
- Equipment: Mixing bowl, whisk, spoon, and clear dessert cups
- Method: No baking (use ready-made brownies for the brownie flavor)
- Best tip: Add gummies, wafers, and popping candy just before serving
What Are Dirt Cups?
Dirt cups are individual pudding desserts layered with crushed cookies. Chocolate cookie crumbs create the familiar “dirt” effect, but you can change the pudding, cookie, and candy flavors to make almost any version you like.
The appeal is the contrast: cool, smooth pudding; a crisp cookie layer; and toppings that are chewy, crunchy, or fruity. Clear cups make the layers visible, so there is no need for elaborate decorating.
All four versions below use a small box of instant pudding prepared with cold milk. The flavored additions come afterward. No unusual baking skills are needed.
Before You Start: Three Tips for Better Layers
- Check the pudding package. A typical 3.4-ounce vanilla or cheesecake instant pudding mix, or 3.9-ounce chocolate mix, uses 2 cups of cold milk. Follow the instructions on the exact brand you buy if they differ.
- Chill the pudding until thick. Whisk it as directed on the box and let it set before layering. If it is runny, the cookie crumbs will sink instead of making clear stripes.
- Save the prettiest toppings for last. Gummies can become wet, sour candy can dissolve, and marshmallows can soften when they sit in pudding for hours.
1. Strawberry Cheesecake Dirt Cups
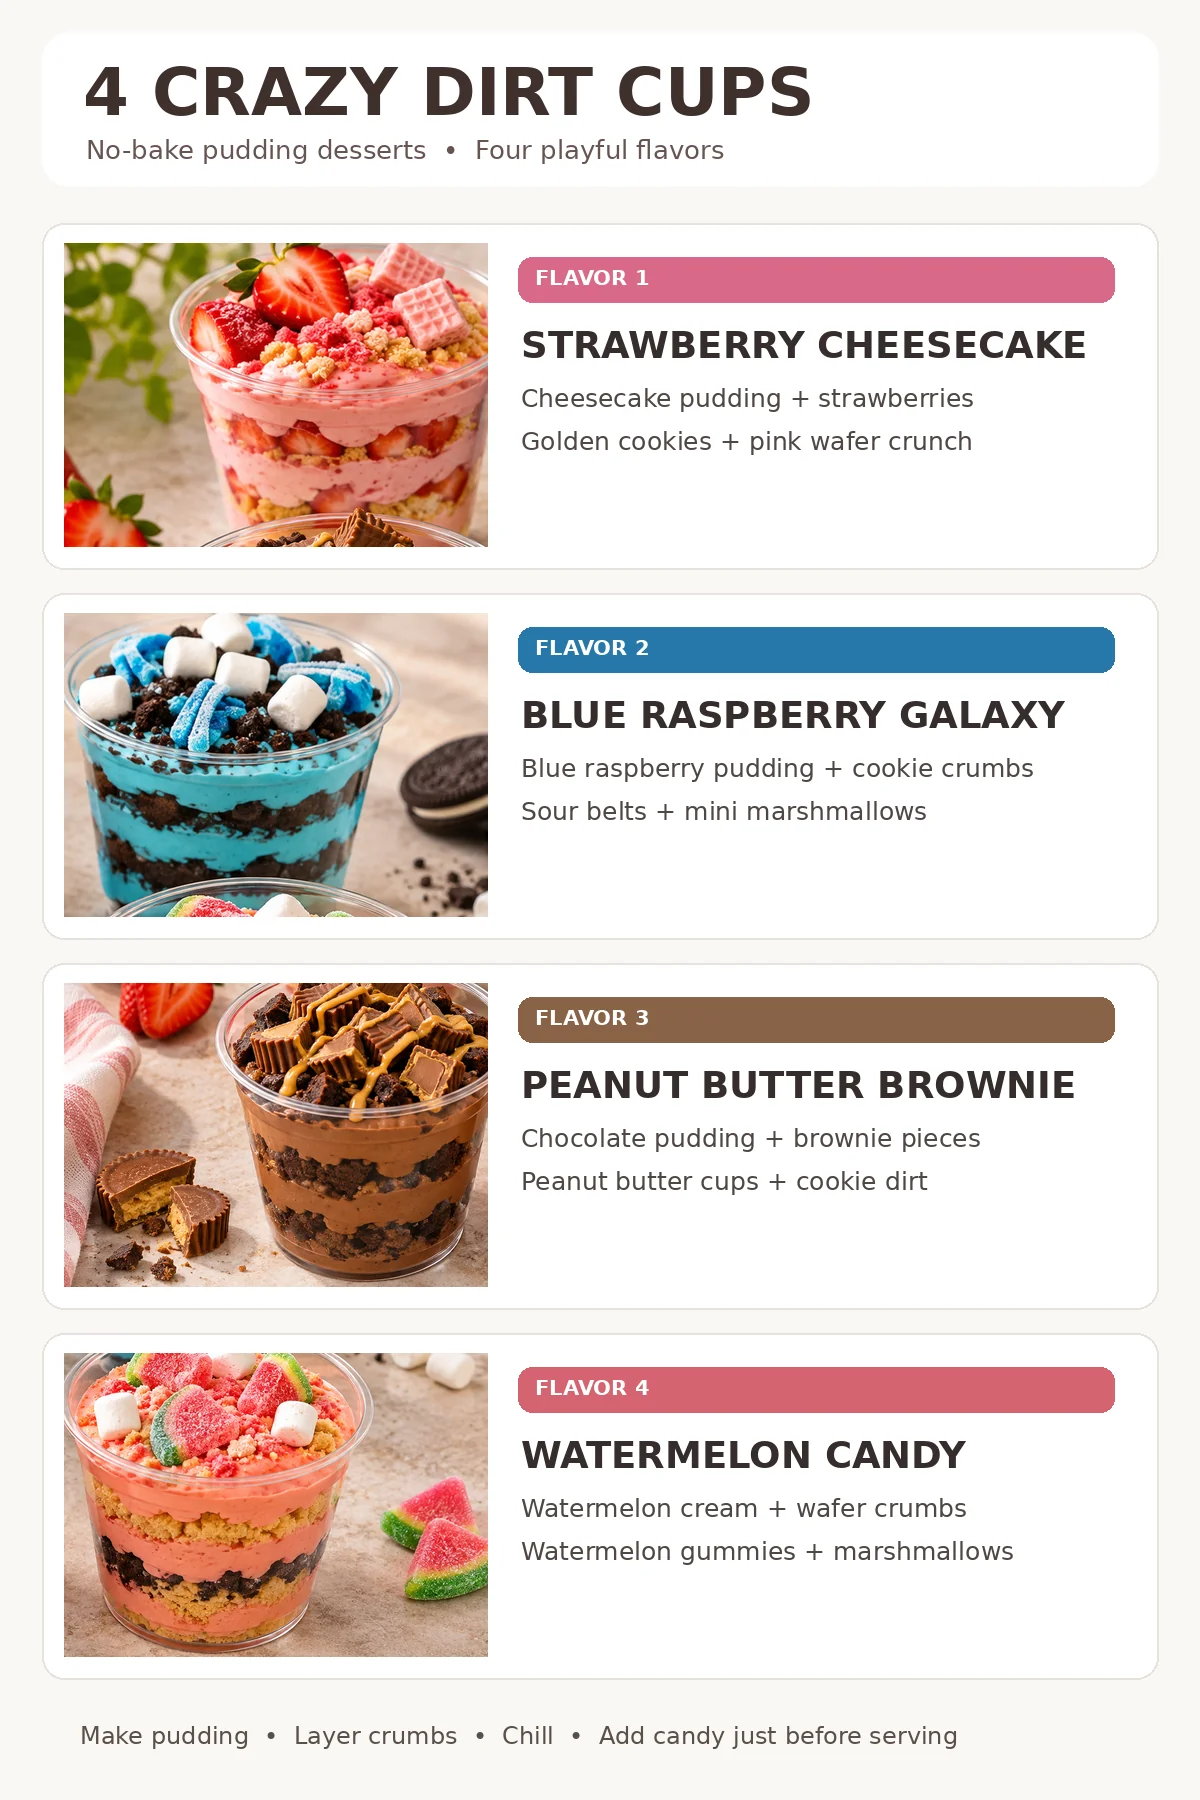
Pink cheesecake pudding, golden cookie crumbs, fresh berries, and strawberry wafers.
Ingredients — Makes 4 Cups
- 1 box (about 3.4 oz) instant cheesecake pudding mix
- 2 cups cold milk, or the amount stated on the pudding package
- ½ cup thawed whipped topping (optional, for a lighter texture)
- 12 golden sandwich cookies, crushed
- 6 strawberry wafer cookies, broken into small pieces
- 1 cup fresh strawberries, diced and patted dry, plus 4 slices to garnish
- 2 tablespoons crushed freeze-dried strawberries
Instructions
- Whisk the cheesecake pudding mix with cold milk according to the box directions. Leave it until thick; gently fold in the whipped topping if using.
- Put a spoonful of crushed golden cookies in each of four clear cups.
- Add a layer of cheesecake pudding, followed by a little diced strawberry and more cookie crumbs. Repeat once, ending with pudding.
- Cover and chill for 30–60 minutes. Before serving, top with strawberry wafers, freeze-dried strawberry crumbs, and a fresh strawberry slice.
Easy swap: If cheesecake-flavored instant pudding is unavailable, use vanilla instant pudding. The result will be more like a strawberry vanilla parfait, but it will still layer well.
2. Blue Raspberry Galaxy Cups
Bright blue, creamy pudding with chocolate-cookie “space dust” and sour candy.
Ingredients — Makes 4 Cups
- 1 box (about 3.4 oz) instant vanilla pudding mix
- 2 cups cold milk, or as directed on the package
- A few drops of food-grade blue raspberry flavoring, following the product label
- Blue gel food coloring, added a little at a time
- ½ cup thawed whipped topping (optional)
- 12 chocolate sandwich cookies, crushed
- 4 blue sour candy belts, cut into short pieces
- ½ cup mini marshmallows
- 1 tablespoon blue popping candy (optional)
Instructions
- Make the vanilla pudding with cold milk and let it thicken. Stir in a small amount of blue raspberry flavoring and blue coloring. Taste before adding more flavoring.
- Fold in the whipped topping if you prefer a fluffier blue filling.
- Layer chocolate-cookie crumbs and blue pudding twice in four clear cups. Save a little crumb mixture for the tops.
- Chill for 30–60 minutes. Just before serving, add sour belt pieces, mini marshmallows, and optional popping candy.
Flavor note: Blue food coloring changes the appearance, not the taste. If you skip blue raspberry flavoring, these are blue vanilla dirt cups rather than raspberry-flavored cups.
3. Peanut Butter Brownie Crunch Cups
Chocolate pudding, brownie pieces, cookie crumbs, and peanut butter cup toppings.
Ingredients — Makes 4 Cups
- 1 box (about 3.9 oz) instant chocolate pudding mix
- 2 cups cold milk, or as directed on the package
- ½ cup thawed whipped topping (optional)
- 1 cup fully cooled, ready-made brownies, cut into small pieces
- 8 chocolate sandwich cookies, crushed
- 8 mini peanut butter cups, chopped
- 2 tablespoons smooth peanut butter for drizzling
- 1–2 teaspoons milk, only if needed to loosen the drizzle
Instructions
- Whisk the chocolate pudding mix with cold milk as directed. Let it thicken, then gently fold in the whipped topping if using.
- Add a small spoonful of cookie crumbs to each cup, followed by chocolate pudding and brownie pieces. Repeat the layers.
- Cover and refrigerate for 30–60 minutes.
- Before serving, add chopped peanut butter cups. Stir the peanut butter until pourable; add a teaspoon or two of milk if necessary, then drizzle a little over each cup.
Texture tip: Use brownies that are completely cool. Warm brownies can soften the pudding and blur the layers.
Allergy note: This version contains peanuts and dairy, and may contain wheat, soy, and egg depending on the brownies and candy. Check every label before serving.
4. Watermelon Sour Candy Cups
Pink watermelon-flavored pudding, vanilla wafers, and sweet-tart candy toppings.
Ingredients — Makes 4 Cups
- 1 box (about 3.4 oz) instant vanilla pudding mix
- 2 cups cold milk, or as directed on the package
- A few drops of food-grade watermelon flavoring, following its label
- Pink gel food coloring, optional
- 10 golden sandwich cookies, crushed
- 6 pink strawberry wafer cookies, crushed
- ½ cup sour watermelon gummy candies
- ⅓ cup mini marshmallows
- 1 tablespoon crushed sour watermelon candy, optional
Instructions
- Whisk vanilla instant pudding with cold milk. Once it thickens, add a little watermelon flavoring and a touch of pink food coloring if desired.
- Combine most of the golden-cookie crumbs with the strawberry-wafer crumbs, keeping a little of each aside.
- In four clear cups, layer the pink pudding and cookie mixture twice. Finish with a smooth layer of pudding.
- Cover and chill for 30–60 minutes. Add watermelon gummies, mini marshmallows, and the remaining cookie or candy crumbs just before serving.
Keep it creamy: Do not pour watermelon juice or sour candy powder directly into the milk mixture. Use food-grade flavoring in the pudding and reserve the sour candy for the top.
Which Dirt Cup Flavor Should You Make?
| Flavor | Best For | Crunch |
|---|---|---|
| Strawberry Cheesecake | Berry lovers and pink parties | Golden cookies and wafers |
| Blue Raspberry Galaxy | Bright birthday themes | Chocolate cookies and sour candy |
| Peanut Butter Brownie | Rich chocolate desserts | Brownies, cookies and candy |
| Watermelon Sour Candy | Summer and candy parties | Vanilla cookies and gummies |
Can You Make Dirt Cups Ahead of Time?
Yes. Make the pudding and assemble the basic pudding-and-cookie layers up to a day ahead. Cover the cups and keep them refrigerated. The cookies will soften slightly overnight, which some people prefer.
For sharper layers and more crunch, assemble the cups closer to serving time. Add fresh berries, wafer pieces, sour belts, mini marshmallows, and popping candy at the end. These toppings can lose their texture when left against moist pudding.
Party shortcut: Crush the cookies and portion dry toppings into covered containers the day before. Make the pudding cups in the morning, then decorate right before guests arrive.
How to Store 4 Crazy Dirt Cup Recipes You Need to Try
Keep pudding desserts covered in the refrigerator at 40°F (4°C) or below. Refrigerate them promptly, and do not leave perishable desserts at room temperature for more than two hours—or one hour when the temperature is above 90°F (32°C). These limits follow CDC food-safety guidance.
For the best flavor and texture, aim to eat assembled candy-topped cups within about one to two days. Fresh berries and cookies may become watery or soft sooner. This is a quality guideline, not a guaranteed storage life; follow the ingredient labels and discard anything that was stored unsafely.
Serving note: Some gummies, marshmallows, and small candy pieces can be choking hazards for young children. Choose age-appropriate toppings and supervise children while eating.
Common Dirt Cup Problems
My Pudding Is Too Thin
Use the amount and type of milk specified for your pudding mix, whisk for the full time stated on the package, and give it time to set before layering. Plant-based milks and some sugar-free mixes may require different instructions.
The Cookies Disappear Into the Pudding
Make the crumbs slightly coarser and let the pudding thicken before assembly. Very fine crumbs absorb moisture quickly, especially when the cups sit overnight.
The Candy Colors Run
Colorful gummies, sour belts, and sprinkles can bleed into moist pudding. Add them immediately before serving.
The Cups Taste Too Sweet
Use a thinner candy layer, more fresh fruit in the strawberry version, or fewer peanut butter cup pieces in the brownie cups. The pudding is already sweet, so the topping does not need to be heavy.
Frequently Asked Questions
Can I use ready-made pudding cups?
Yes. Use enough prepared pudding to give each serving a couple of pudding layers. This saves mixing time, especially when making several flavors for a party.
Do dirt cups need baking?
No. These recipes use instant pudding and ready-to-eat cookies and candy. For the brownie version, use already baked and cooled brownies.
What size cups work best?
Clear 8-ounce dessert cups are a useful size for these portions. Wider cups create more visible layers; narrower cups make taller stripes.
Can I make dirt cups without chocolate cookies?
Yes. Golden sandwich cookies, vanilla wafers, graham crackers, or wafer cookies work well. The result will look more like a layered parfait than classic dark “dirt,” but it will taste good.
Can I make all four flavors at once?
Yes. Each recipe yields four individual cups, so following all four recipes makes approximately 16 cups. Keep each pudding flavor in its own bowl to prevent colors and flavors from mixing.
Do the blue and watermelon versions need special pudding?
No. Both start with vanilla instant pudding. Food-grade flavoring provides the intended taste, while food coloring only changes the appearance. Follow the flavoring manufacturer’s instructions and start with a small amount.
Sources and Food Safety
The basic layering method follows the established pudding-and-cookie dirt cup technique; see Kraft’s dirt cups recipe. For food temperatures and the two-hour refrigeration rule, see CDC food safety guidance.
Recipe testing note: These four flavored variations are practical recipe adaptations of the standard dirt cup method. They have not been kitchen-tested for this article; test a small batch and confirm the pudding package directions before presenting them as personally tested.