Table of Contents
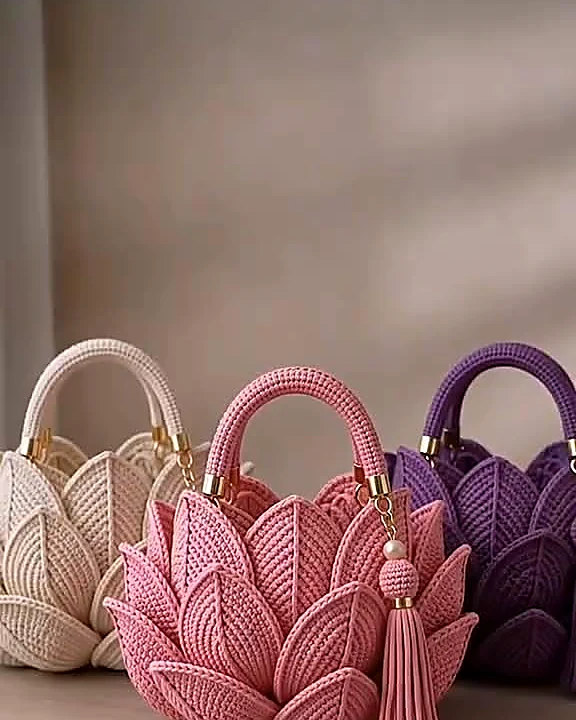
There's something magical about crocheting a bag that looks like a blooming lotus flower. The layered petals, the soft cotton yarn, and the delicate gold rings come together to create a piece that's both practical and pretty. Whether you're an experienced crocheter or just starting out, this pattern is designed to be approachable and rewarding. In this tutorial, I'll walk you through every stitch, from the magic ring to the final tassel, so you can make your own lotus bag in cream, pink, or purple.
Why You'll Love This Lotus Bag
- Beginner-friendly: Only basic stitches are used, and each round is clearly explained with stitch counts.
- Quick to make: Most crocheters finish in 3–4 hours, perfect for a weekend project.
- Customizable: Choose any color combo to match your style.
- Functional: Roomy enough for essentials, with a sturdy handle and cute tassel.
- Great gift: Handmade bags are always a hit for friends and family.
Materials You'll Need
- Yarn: Worsted weight (medium 4) cotton yarn – about 200 yards. I used cream, pink, and purple for the samples. Cotton holds its shape well and is durable.
- Hook: 4.0 mm (US G-6) – adjust if you crochet tightly or loosely.
- Notions: Tapestry needle, scissors, stitch marker.
- Hardware: Two gold-colored metal rings (about 1 inch diameter) for handle attachments, and a small gold clasp or bead for the tassel (optional).
Abbreviations & Stitches Used
- ch – chain
- sc – single crochet
- dc – double crochet
- hdc – half double crochet
- sl st – slip stitch
- inc – increase (2 sc in same stitch)
- dec – decrease (sc2tog)
- mr – magic ring
Step-by-Step Pattern
Note: The bag is worked in continuous rounds. Use a stitch marker to mark the first stitch of each round. Stitch counts are given at the end of each round.
Base of the Bag
Round 1: Start with a magic ring. Work 6 sc into the ring. Pull tight. (6 sts)
Round 2: Inc in each stitch around. (12 sts)
Round 3: Sc in next st, inc in next st; repeat from around. (18 sts)
Round 4: Sc in next 2 sts, inc in next st; repeat from around. (24 sts)
Round 5: Sc in next 3 sts, inc in next st; repeat from around. (30 sts)
Round 6: Sc in next 4 sts, inc in next st; repeat from around. (36 sts)
Round 7: Sc in next 5 sts, inc in next st; repeat from around. (42 sts)
Round 8: Sc in next 6 sts, inc in next st; repeat from around. (48 sts)
Round 9: Sc in next 7 sts, inc in next st; repeat from around. (54 sts)
Round 10: Sc in next 8 sts, inc in next st; repeat from around. (60 sts)
Round 11: Sc in each st around. (60 sts) – This creates a flat base.
Sides of the Bag
Round 12: Working in the back loops only, sc in each st around. (60 sts) – This creates a crisp edge for the bag to stand.
Rounds 13–20: Sc in each st around. (60 sts) – Continue until the bag reaches your desired height (about 4 inches from the base).
Lotus Petals (Top Edge)
The petals are worked directly onto the top edge of the bag. You'll create five petals, each spanning 12 stitches.
Petals: Join contrasting color (if desired) with sl st in any stitch.
Row 1: Ch 1, sc in same st, sc in next 11 sts. Turn. (12 sts)
Row 2: Ch 1, sc in first st, dc in next st, ch 1, dc in same st (creates a small point); repeat from across, ending with sc in last st. Turn. (This creates the pointed petal shape.)
Row 3: Ch 1, sc in each st and ch-1 space across. (12 sts) Fasten off.
Skip 2 stitches on the bag edge, then repeat Rows 1–3 for the next petal. Continue until you have 5 petals. Fasten off and weave in ends.
Handle
Row 1: Join yarn at the top edge of the bag, leaving a 2-inch tail. Ch 1, sc in next 6 sts. Turn. (6 sts)
Row 2: Ch 1, sc in each st across. Turn. (6 sts)
Repeat Row 2 until the handle measures about 12 inches (or desired length). Fasten off, leaving a long tail for sewing.
Attach one end of the handle to the bag with a gold ring: Fold the handle end over the ring and sew securely. Repeat for the other side.
Tassel (Optional)
Cut 10 strands of yarn, each about 6 inches long. Fold them in half and tie a knot at the top to create a loop. Wrap a small piece of yarn around the top to secure, then attach to the bag with a gold clasp or bead.
Pro-Tip: Keep your tension consistent to ensure the bag holds its shape. If your bag tends to curl, try going up a hook size.
Troubleshooting & Common Mistakes
- Bag curling: This often happens if your tension is too tight. Try relaxing your grip or using a larger hook.
- Petals not standing up: Make sure you work the petals in the back loops of the top edge, and consider using a bit of fabric stiffener if needed.
- Handle stretching: Cotton yarn can stretch over time. You can reinforce the handle by crocheting over a piece of ribbon or using a smaller hook for the handle.
Care Instructions
Hand wash your bag in cold water with mild soap. Gently squeeze out excess water and reshape. Lay flat to dry. Do not bleach or iron.
Frequently Asked Questions
Can I use a different yarn weight?
Yes, but adjust your hook size accordingly. A worsted weight yarn with a 4.0 mm hook is recommended for a sturdy bag. If using DK weight, try a 3.5 mm hook.
How do I make the bag larger?
Simply continue increasing the base rounds until you reach your desired diameter, then work even rounds for the sides. You'll need more yarn.
Is this pattern suitable for absolute beginners?
Absolutely! The stitches are basic, and the pattern includes detailed counts. If you're new to crochet, practice the magic ring and single crochet first.
Can I sell items made from this pattern?
Yes, you may sell finished items, but please credit the designer and do not reproduce the pattern itself.
I hope you enjoy making this lotus flower bag as much as I did! It's a joy to see the petals take shape and to finish with a practical, beautiful accessory. Happy crocheting!
Lotus Flower Crochet Bag
★★★★★
4.9
(36 reviews)
A beautiful crocheted bag shaped like a lotus flower with layered petals, a sturdy handle, and an optional tassel. Perfect for beginners.
📦 Materials & Supplies
- ✓Worsted weight cotton yarn (200 yards)
- ✓4.0 mm (US G-6) crochet hook
- ✓Tapestry needle
- ✓Scissors
- ✓Stitch marker
- ✓Two gold-colored metal rings (1 inch)
- ✓Gold clasp or bead for tassel (optional)
📋 Step-by-Step Instructions
-
1Round 1: Magic ring, 6 sc into ring. (6 sts)
-
2Round 2: Inc in each st around. (12 sts)
-
3Round 3: *Sc in next st, inc in next st; repeat from * around. (18 sts)
-
4Round 4: *Sc in next 2 sts, inc in next st; repeat from * around. (24 sts)
-
5Round 5: *Sc in next 3 sts, inc in next st; repeat from * around. (30 sts)
-
6Round 6: *Sc in next 4 sts, inc in next st; repeat from * around. (36 sts)
-
7Round 7: *Sc in next 5 sts, inc in next st; repeat from * around. (42 sts)
-
8Round 8: *Sc in next 6 sts, inc in next st; repeat from * around. (48 sts)
-
9Round 9: *Sc in next 7 sts, inc in next st; repeat from * around. (54 sts)
-
10Round 10: *Sc in next 8 sts, inc in next st; repeat from * around. (60 sts)
-
11Round 11: Sc in each st around. (60 sts)
-
12Round 12: Working in back loops only, sc in each st around. (60 sts)
-
13Rounds 13-20: Sc in each st around. (60 sts)
-
14Petals: Join contrasting color, work 5 petals of 12 sts each as follows: Row 1: sc in 12 sts, turn. Row 2: ch 1, sc in first st, *dc in next st, ch 1, dc in same st; repeat from * across, ending with sc in last st, turn. Row 3: ch 1, sc in each st and ch-1 sp across. Fasten off. Skip 2 sts between petals.
-
15Handle: Join yarn at top edge, ch 1, sc in next 6 sts. Turn. Repeat row until handle measures 12 inches. Fasten off, sew ends to bag with gold rings.
-
16Tassel: Cut 10 strands of yarn, fold in half, tie knot, wrap top, attach to bag with clasp.