Table of Contents
- What Makes These Pixel Fish Keychains Move?
- Materials and Tools
- Free Pixel Fish Bead Pattern: Pink, Blue, and Skeleton
- How to Make a Moving Perler Bead Fish Keychain
- Choose Your Fish Design
- How to Make the Keychain Stronger
- Common Mistakes and Easy Fixes
- Other Ways to Use the Same Pattern
- Frequently Asked Questions
- Sources and Further Reading
These DIY pixel fish keychains are made from colorful fuse beads and a few tiny metal rings. The fish is built in three separate pieces—head, body, and tail—so it wiggles when you pick it up. Use the free bead chart below to make a pink fish, a blue fish, or a black-and-white fish skeleton.
- Skill level: Beginner with adult help for ironing
- Hands-on time: Around 45–75 minutes for one keychain
- Design: 3 separate beaded pieces + 2 connecting rings
- Beads per fish: 207 using the original chart below
- Best for: Backpack charms, zipper pulls, and handmade gifts
- Bead type: Standard 5 mm fuse beads (Perler-style)
What Makes These Pixel Fish Keychains Move?
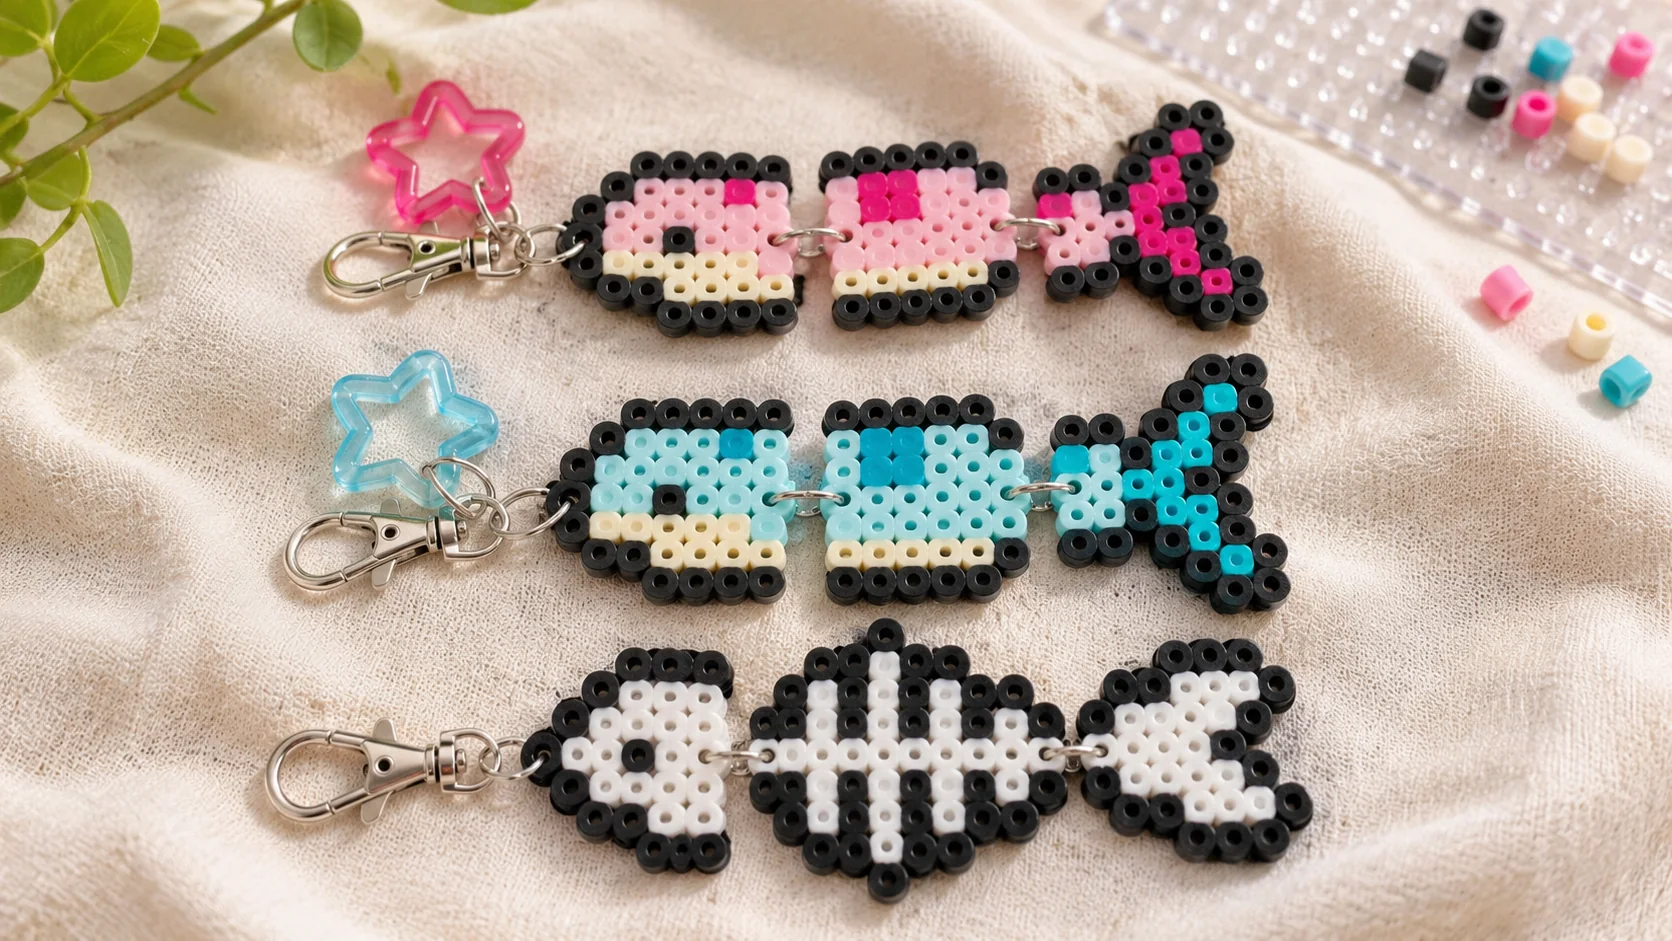
Most fuse-bead keychains are one solid shape. These work differently. You make the head, middle section, and tail on a pegboard as three separate pieces. After the beads are fused and cooled, you connect those pieces with metal jump rings.
The rings act as small hinges. The fish can curve or swing as you move your bag, but the beads themselves stay solid. That is the main detail to notice in the inspiration photo: the joints are metal, not flexible melted plastic.
You can use the same shape in different colors. The pink and aqua fish have a dark pixel outline, cream bellies, and a small eye. The skeleton uses black and white beads to make a bony-looking version.
Materials and Tools
- Fuse beads: About 207 standard 5 mm beads per fish, plus a few extras in case of mistakes
- Colors: Black, white/cream, and pink or aqua; optional darker accent color
- Square pegboard: Large enough for an 11 × 11 bead section
- Fuse-bead ironing paper: Follow your bead maker’s instructions
- Household iron: Used by an adult, steam off
- Small jump rings: Two sturdy rings, about 8–10 mm outer diameter, sized to fit your bead holes
- Keychain hardware: Lobster clasp or split ring and one additional connecting ring
- Jewelry pliers: Two pairs make opening and closing rings easier
- Optional: Acrylic star charm and a heavy book for cooling pieces flat
Safety: Small beads and metal parts are choking hazards. They are not suitable for young children. Only an adult should handle the hot iron and freshly heated pieces. Never put an iron directly onto the beads or the plastic pegboard.
Free Pixel Fish Bead Pattern: Pink, Blue, and Skeleton
This original chart shows all nine pieces: three for each fish. One circle means one bead. Follow the colors as shown, leaving the blank areas completely empty. Make each section separately—even where the finished fish will eventually bend.
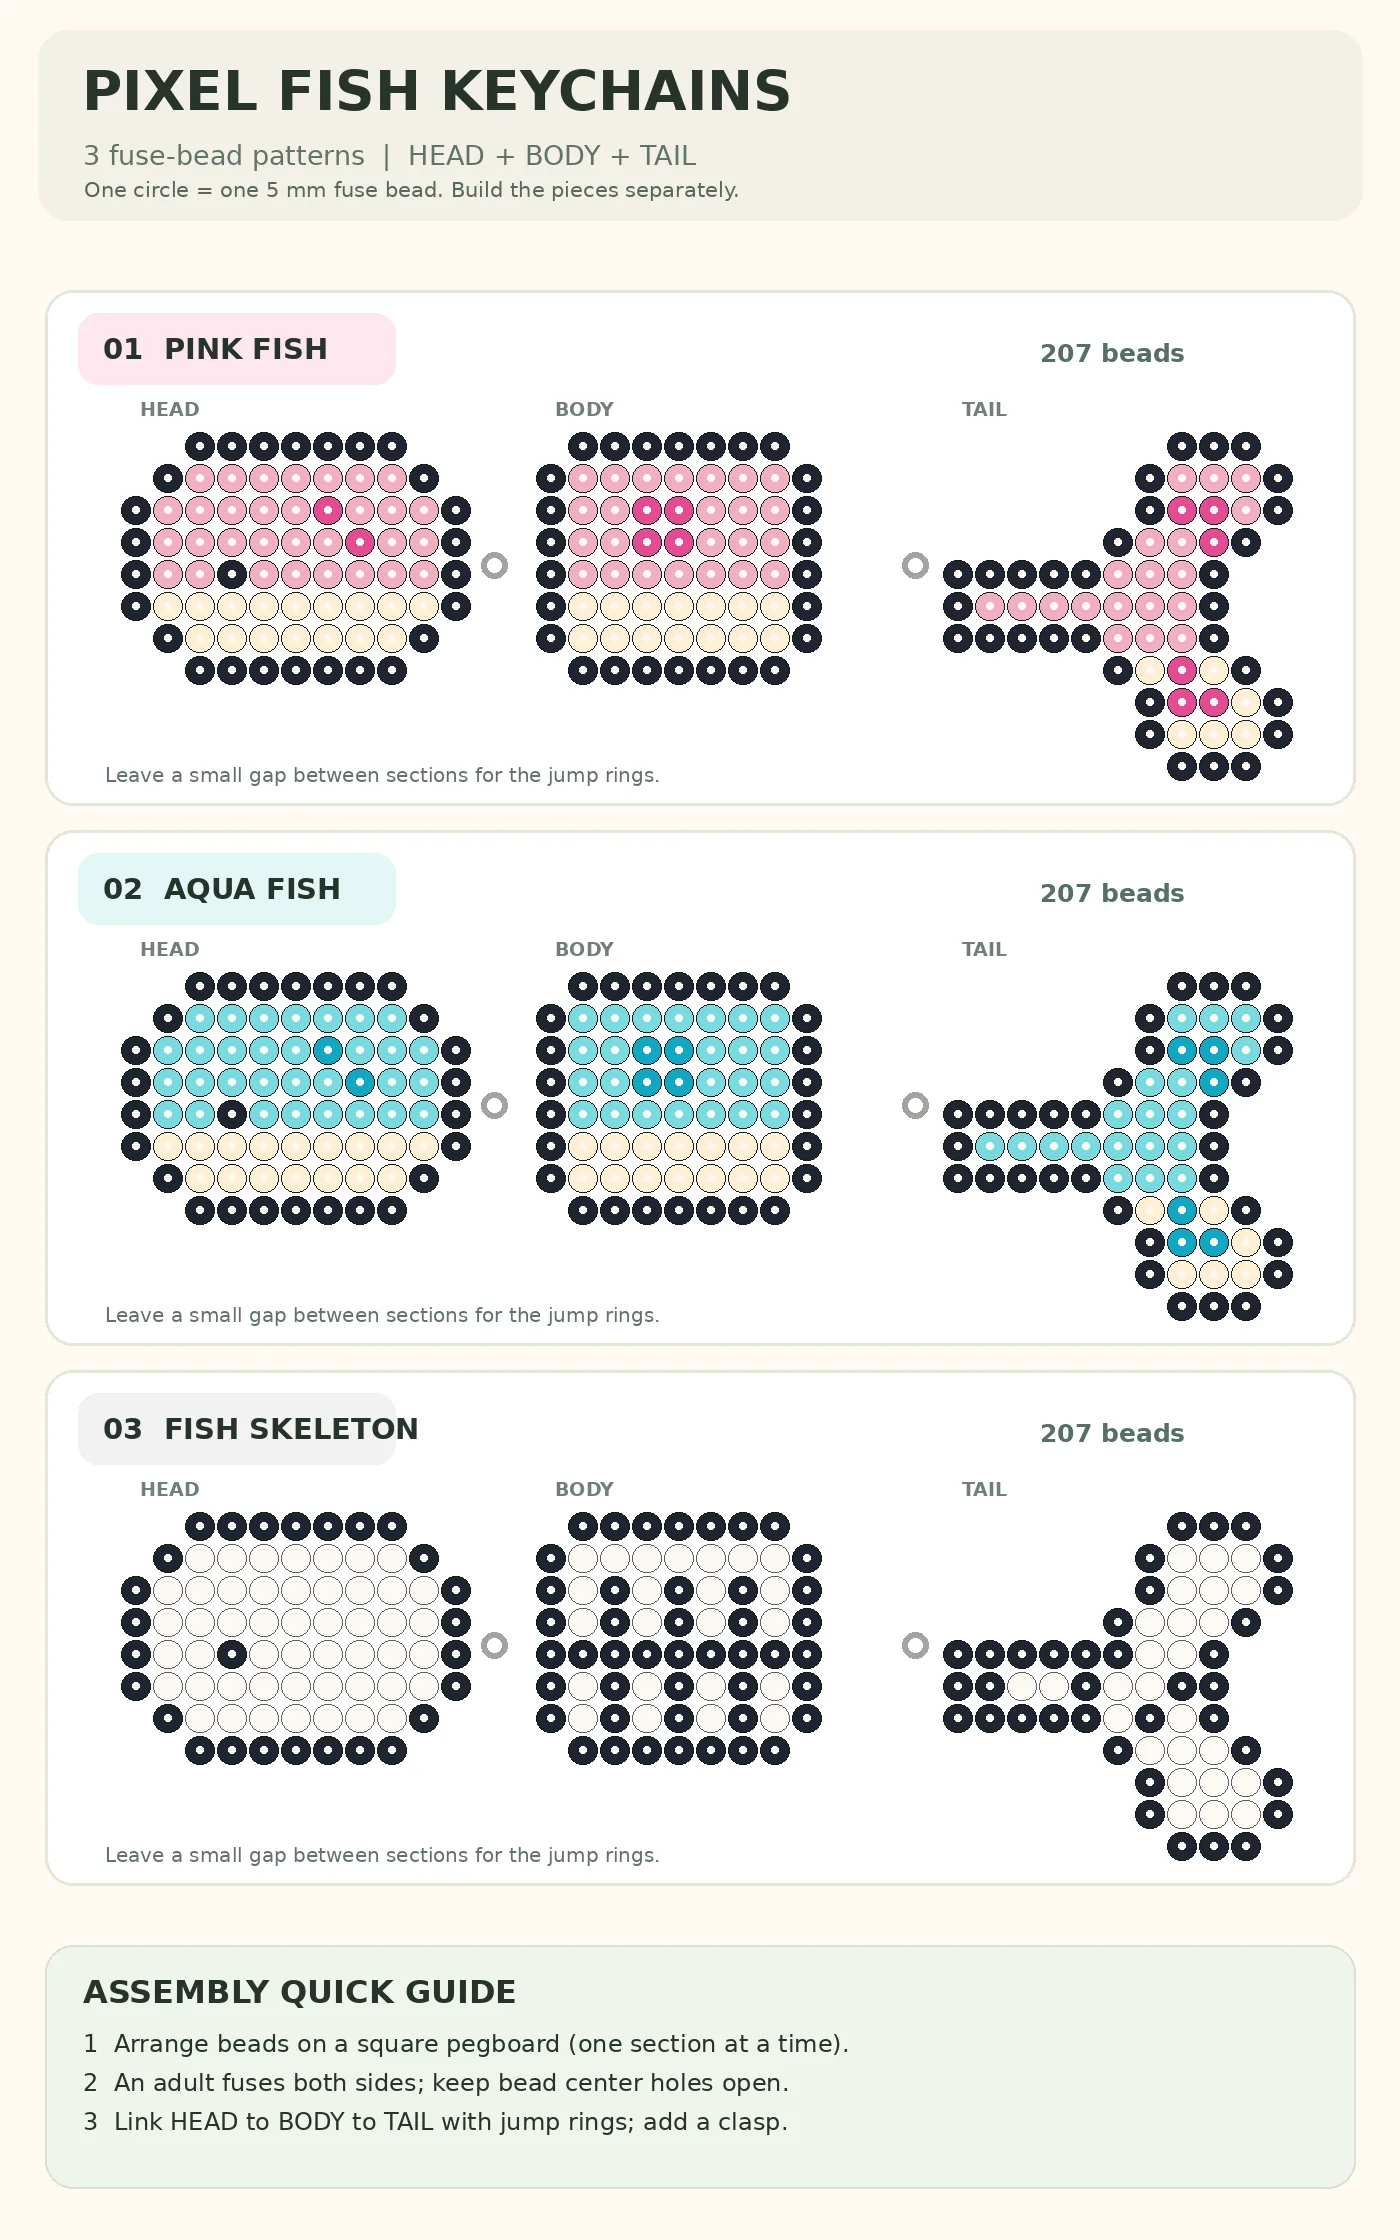
| Piece | Grid footprint | Beads needed |
|---|---|---|
| Head | 11 columns × 8 rows | 76 |
| Middle body | 9 columns × 8 rows | 68 |
| Tail | 11 columns × 11 rows | 63 |
| Total | Three separate sections | 207 |
The grid size describes the space a design occupies, not the number of beads in a full rectangle. Empty spaces are intentional, especially around the tail fins.
How to Make a Moving Perler Bead Fish Keychain
- Pick your fish colors. Choose pink and cream, aqua and cream, or black and white. Put each color into a small bowl so you do not lose beads while placing them.
- Build the head. Start with the black outer edge on your square pegboard, then fill the face and belly. Add one black eye bead. Compare your rows with the HEAD section of the chart before ironing.
- Build the middle section. Make the BODY on the pegboard separately. Use the same dark outline and put the colored rows above the cream belly. Do not connect the body to the head with beads.
- Make the tail. Follow the TAIL chart, paying attention to the narrow connection on the left and the two fins on the right. Check that every placed bead touches the shape through neighboring beads, not just a corner.
- Fuse the pieces. Move the pegboard onto a flat, heat-safe work area. An adult should cover each piece with approved ironing paper, then use a dry iron at the setting recommended by the bead brand, moving gently in circles. The official Perler instructions suggest roughly 10–20 seconds per side as a starting point, but timing varies with the iron and design.
- Cool and fuse the other side. Let the first side cool enough to lift carefully. Turn the piece over, cover it with ironing paper, and fuse the reverse side. Let it cool flat. Keep the tiny bead holes at the connecting edges open enough for the rings.
- Arrange the three pieces. Lay them on the table in order: HEAD → BODY → TAIL. Position the eye at the left, with the tail fins pointing right. Leave a narrow gap between sections so they can move freely.
- Attach the two jump rings. Use jewelry pliers to twist a ring sideways, not pull its ends straight apart. Pass the first ring through an outer bead hole on the right of the head and an outer bead hole on the left of the body. Close it fully. Repeat to join body and tail.
- Add the clasp and test the movement. Connect a keychain clasp to a strong outer bead hole near the fish’s head using another ring. Add a star charm if you like. Gently move the fish and check that both joints swing without catching.
Hardware check: The two linking rings should pass through actual bead holes, not through gaps where beads have melted apart. If the holes closed during fusing, make another sample rather than forcing a metal ring through brittle plastic.
Choose Your Fish Design
For a matching set, use the same clasp size and jump-ring finish on all three charms. A matching translucent star on the pink and blue fish creates a cute detail without making the design crowded.
How to Make the Keychain Stronger
- Fuse both sides evenly. For wearable charms, the sections should be firmly joined; loose edge beads can come off with daily use.
- Do not flatten the bead holes completely. You need open edge holes for the jewelry hardware.
- Use strong jump rings. Thin craft rings can pull open on keys or backpacks. Close the gap completely.
- Test the connection points. Each ring should be attached through a bead that is connected to several neighboring beads, not a fragile single-bead extension.
- Avoid hard pulls. These are handmade decorative charms, not load-bearing key straps.
Common Mistakes and Easy Fixes
| Problem | Cause | Fix |
|---|---|---|
| Beads fall off the edge | Uneven fusing | Make a test patch and fuse edges more evenly |
| Piece curls while cooling | Uneven heat or cooling | Cool it flat under a book once safe to handle |
| Jump ring does not fit | Hole closed or ring too thick | Use compatible hardware and keep holes open when fusing |
| Fish cannot wiggle | Rings too tight or sections touch | Use slightly larger rings and leave a small gap |
| Tail twists sideways | Ring attached off-center | Move it to a more central, sturdy edge hole |
| Colors look different | Mixed brands or bead types | Use one size and compatible beads throughout |
Other Ways to Use the Same Pattern
A lobster clasp turns the fish into a backpack decoration or zipper pull. A split ring works for keys. You can also remove the hardware entirely and use a single fish section as a flat magnet or small craft decoration.
Want a matching handmade gift bag or room decoration? Our DIY paper flower wall decor tutorial is another approachable project to try with basic craft materials.
Frequently Asked Questions
What beads do I need for these pixel fish keychains?
Use standard 5 mm fuse beads on a compatible square pegboard. This guide is designed around that size. Smaller mini beads will produce a smaller charm and require different handling.
How many beads are needed for one fish?
The original chart in this article uses exactly 207 beads: 76 for the head, 68 for the middle, and 63 for the tail. Keep a few spare beads available for replacements.
Can I make these without metal jump rings?
Yes, but the sections will not move in the same way. You could make a solid one-piece fish instead. For the wiggly three-piece design, the metal connectors are essential.
Do I have to iron both sides?
The bead manufacturer Perler recommends fusing both sides for a strong result. For these moving charms, even fusion is especially helpful around the points where the rings attach.
Are these good crafts for children?
Older children who can safely handle small beads may enjoy placing the colors with supervision. Adults must perform the ironing and should handle sharp tools and small metal findings.
Can I sell finished keychains made with this pattern?
The fish pattern presented here is an original KOSMAX-style design, but always check the terms attached to any outside patterns, brand imagery, and materials you use. This guide does not grant rights to copied logos or characters.
Sources and Further Reading
For manufacturer instructions about fusing both sides, ironing-paper use, and keeping bead holes open, see Perler’s Standard Fusing Method. For an example of attaching a clasp with a jump ring, see Perler’s Cherry Keychain tutorial.