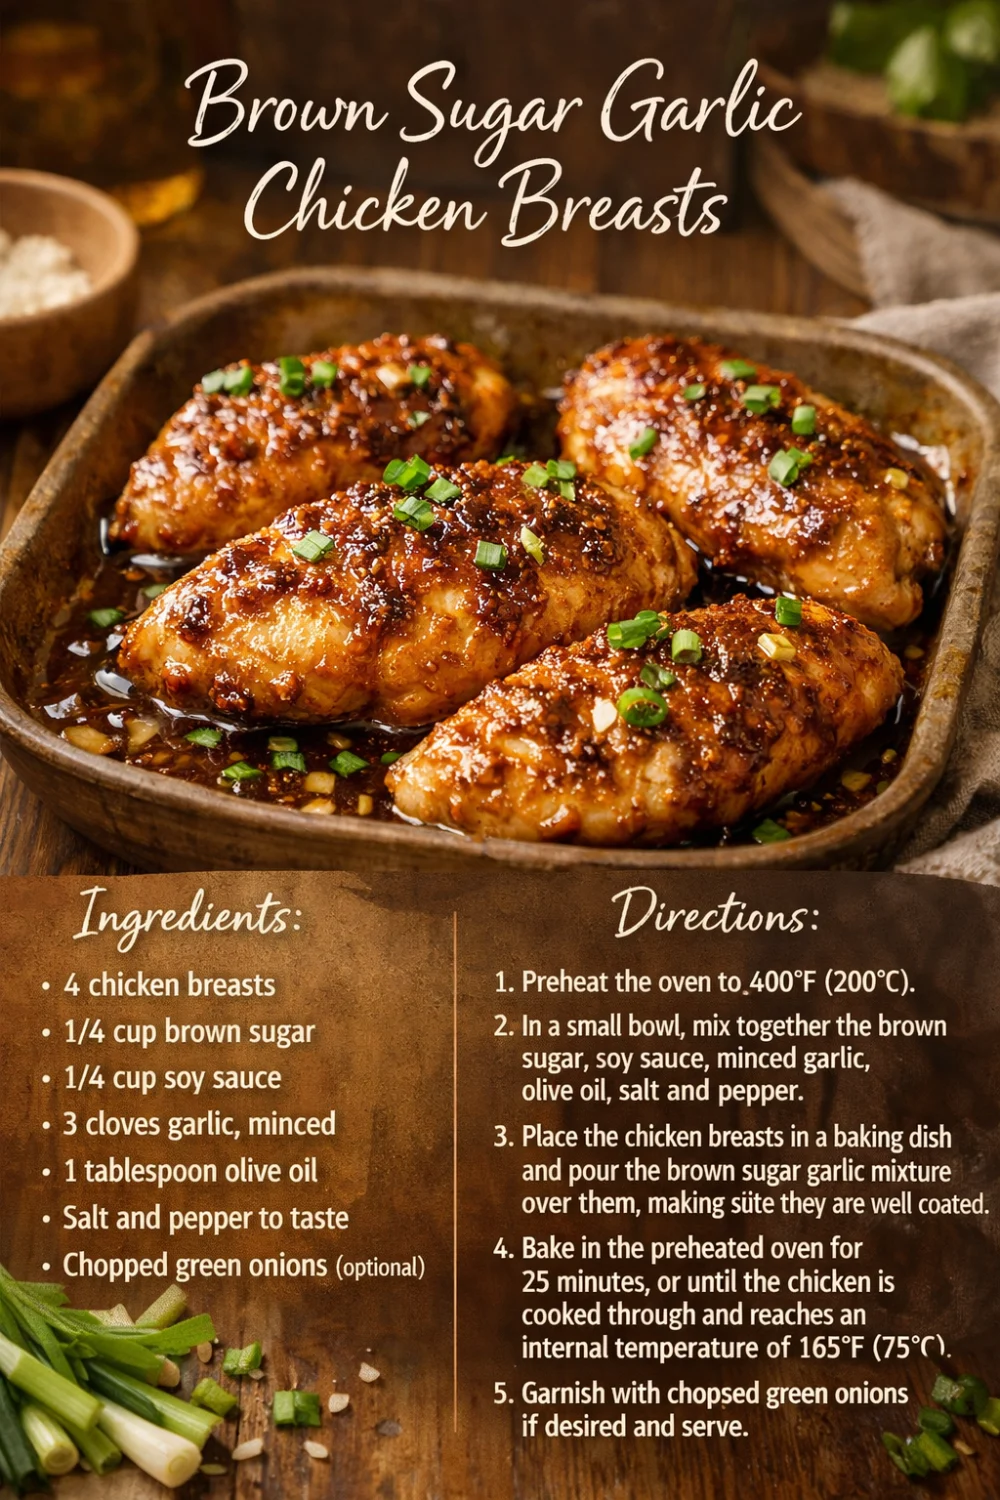
Some nights you just need a dinner that delivers big flavor without demanding hours in the kitchen. That is exactly where these brown sugar garlic chicken breasts shine. With a handful of basic ingredients and a single baking dish, you get tender, juicy chicken coated in a glossy sweet-and-savory glaze that tastes like you put in way more effort than you actually did. The combination of caramelized brown sugar, salty soy sauce, and fragrant fresh garlic hits all the right notes, making this the kind of recipe you will find yourself returning to again and again.
Why This Brown Sugar Garlic Chicken Breast Recipe Works
This dish solves a common weeknight dilemma: how to make boneless, skinless chicken breasts interesting. Lean chicken breast is a blank canvas, which is wonderful but can also mean bland results if handled poorly. Here, a simple glaze does the heavy lifting. The brown sugar melts into the soy sauce under oven heat, creating a thin, sticky coating that locks in moisture while the garlic infuses every bite. Because the ingredient list is so short, each element has a chance to stand out, and you likely already have everything you need in your pantry right now.
Time is another big win. The recipe moves from prep to table in roughly twenty-five minutes, which slots perfectly into busy evenings when everyone is hungry and patience is thin. There is no searing, no complicated techniques, and very little cleanup. That means less stress and more time to actually sit down and enjoy the meal together.
Ingredients That Make the Glaze Work
The magic of this recipe lives in the balance of its few key components. Understanding how they interact helps you appreciate why such a modest lineup can produce such satisfying results. The brown sugar brings deep molasses notes and caramelizes slightly in the heat, while the soy sauce adds salinity and umami depth. Fresh minced garlic provides a pungent, aromatic backbone that mellows and sweetens as it bakes. Olive oil contributes richness and helps the glaze spread evenly over the surface of the chicken. A final scatter of chopped green onions introduces a mild, fresh bite that cuts through the sweetness and makes the finished dish look vibrant and appealing.
Salt and pepper are the simple seasonings that tie everything together, but the soy sauce already carries plenty of sodium, so a light hand with additional salt is wise. The green onion garnish is optional, but it adds a colorful finish that elevates the presentation from everyday to something you would be proud to serve guests.
Step-by-Step Preparation
Getting this meal on the table is straightforward, but a few small details make a difference in the final result. Follow these steps for consistently excellent chicken.
- Preheat your oven. Set the temperature so it is fully hot by the time the chicken goes in. A properly heated oven ensures the glaze begins to set quickly and the chicken cooks evenly.
- Prepare the glaze mixture. In a small bowl, combine the brown sugar, soy sauce, minced garlic, and olive oil. Stir until the sugar mostly dissolves into the liquid. The mixture will look somewhat thin, which is exactly what you want. It will thicken and concentrate as it bakes.
- Arrange the chicken. Place the four boneless, skinless chicken breasts in a single layer inside an oven-safe baking dish. If the breasts are uneven in thickness, consider gently pounding the thicker ends so they cook at the same rate as the thinner portions. This small step prevents dry edges.
- Season and coat. Sprinkle the chicken lightly with salt and pepper, then pour the glaze mixture evenly over each breast. Use a spoon or your fingers to make sure the tops are well coated. Some of the liquid will pool in the bottom of the dish, and that is perfectly fine.
- Bake. Place the dish in the preheated oven and bake for approximately twenty-five minutes. The exact time depends on the thickness of your chicken breasts. You are looking for an internal temperature that signals doneness, and the glaze should appear bubbly and slightly thickened around the edges.
- Rest and garnish. Remove the dish from the oven and let the chicken rest for a few minutes. This allows the juices to redistribute. Sprinkle the optional chopped green onions over the top just before serving for a pop of color and freshness.
Tips for Juicy, Flavorful Results
Small adjustments can take this dish from good to consistently great. Paying attention to the condition of your ingredients and a few technique tweaks will reward you with reliably tender, flavorful chicken.
- Choose similar-sized chicken breasts. When all pieces are roughly the same thickness, they finish cooking at the same time. If some are much thicker than others, gently flatten them with a meat mallet or the bottom of a heavy pan until they are uniform.
- Do not skip the resting period. Cutting into chicken immediately after it leaves the oven causes the juices to run out onto the plate. A short rest of about five minutes keeps the meat moist.
- Use fresh garlic when possible. Pre-minced jarred garlic works in a pinch, but fresh cloves deliver a brighter, more pronounced flavor that stands up well to the sweet and salty glaze.
- Watch the glaze near the end of baking. Ovens vary, and the sugar in the glaze can darken quickly. If the top looks like it is getting too dark before the chicken is cooked through, loosely tent the dish with foil.
- Double the glaze if you want extra sauce. The amount given coats the chicken nicely, but if your family loves plenty of sauce to spoon over rice or vegetables, make a second half-batch and warm it separately on the stovetop.
What to Serve Alongside
The flavor profile of this dish pairs beautifully with simple, neutral sides that soak up the extra glaze and balance the sweetness. Steamed white or brown rice is a natural choice, catching the savory drippings and turning them into something irresistible. Roasted vegetables such as broccoli, green beans, or asparagus add color and nutrition without competing flavors. A crisp cucumber salad or a simple slaw brings brightness and crunch that contrast nicely with the sticky, tender chicken. For a lower-carb option, cauliflower rice or a bed of sautéed greens works just as well.
The leftover glaze in the baking dish is liquid gold, so do not leave it behind. Spoon it generously over whatever side you choose, or drizzle it directly on top of the sliced chicken when plating. A final sprinkle of sesame seeds or additional green onions adds a polished, restaurant-style finish.
Storing and Reheating Leftovers
This recipe makes enough for a family dinner, but if you find yourself with extra chicken, you will be glad to have it on hand. Allow the chicken to cool completely before transferring it to an airtight container. It will keep well in the refrigerator for up to three days. The glaze may thicken when chilled, but it loosens again when gently reheated.
To reheat, place the chicken in a covered skillet over low heat with a splash of water or chicken broth to revive the glaze. You can also use a microwave set to medium power, checking frequently to avoid overcooking, which can make the breast meat tough. The reheated chicken slices beautifully over salads or tucked into sandwiches for a next-day lunch that feels far from leftovers.
Frequently Asked Questions
Can I use chicken thighs instead of breasts?
Yes, boneless chicken thighs work wonderfully in this recipe. They have a higher fat content than breasts, so they stay exceptionally juicy and tender. Adjust the baking time slightly, as thighs may need a few extra minutes to cook through depending on their size.
Is there a way to make this recipe lower in sugar?
You can reduce the brown sugar slightly or substitute a brown sugar alternative designed for baking. Keep in mind that the sugar contributes to the caramelized glaze texture, so reducing it too much will change the final consistency. The flavor will still be pleasant, though less sweet.
Can I prepare this ahead of time?
You can mix the glaze ingredients and store them covered in the refrigerator a day in advance. When you are ready to cook, simply arrange the chicken in the dish, pour the glaze over, and bake. Marinating the raw chicken in the glaze for a few hours is also fine, but because of the soy sauce content, prolonged marinating overnight can start to affect the texture.
What if I do not have fresh garlic?
Garlic powder can substitute in a pinch. Use about one-quarter to one-half teaspoon of garlic powder in place of the three fresh cloves. The flavor will be milder and less aromatic, but you will still get a pleasant garlic note in the finished dish.
How do I know when the chicken is fully cooked?
The most reliable method is to use a meat thermometer. Chicken breast is done when the internal temperature at the thickest part reaches 165 degrees Fahrenheit. If you do not have a thermometer, slice into the thickest breast to check that the meat is opaque white throughout with no pink remaining and the juices run clear.
A Reliable Weeknight Favorite
Having a recipe like these brown sugar garlic chicken breasts in your back pocket changes the way you approach busy evenings. It removes the guesswork and temptation of takeout, replacing it with a homemade meal that genuinely tastes special. The sweet glaze, savory garlic notes, and tender chicken come together with so little effort that you might find yourself making it weekly. Whether you serve it over rice on a hectic Tuesday or present it on a platter for a casual dinner with friends, this dish delivers every time. Give it a try tonight, and watch it become a staple in your own kitchen rotation.