Early childhood classrooms thrive on vibrant displays that showcase children’s individual personalities. Introducing creative sensory experiences helps young learners explore colors, textures, and personal identity in an engaging way. One wonderful project that combines fine motor fun with a personalized keepsake is toddler handprint name art for classroom settings.
This hands-on painting activity allows children to express themselves freely while producing a cherished piece of work for parents to take home. Teachers and caregivers often look for projects that are adaptable for varying developmental stages. Name painting projects offer an approachable entry point for children who are just beginning to recognize letters and shapes.
Gathering Simple Classroom Supplies
Preparing for a successful painting session starts with collecting the right materials. Keeping items accessible ensures a smooth workflow, especially when managing a group of energetic young learners. Non-toxic washable tempera paints work best for sensitive skin and make cleanup much easier on busy school days.
Here are the essential supplies needed for this painting project:
- Sturdy art canvases, heavy cardstock, or thick mixed-media paper
- Washable tempera paints in a variety of bright colors
- Painter’s tape or masking tape for creating name outlines
- Paintbrushes, sponges, or foam rollers
- Baby wipes or damp paper towels for quick hand cleanup
- Smocks or old oversized t-shirts to protect clothing
Setting up a dedicated workstation with covered tables helps minimize mess and encourages stress-free creativity. Having extra wet wipes on hand before the paint starts flowing is always a smart strategy for any educator.
Preparing the Canvas and Masking the Name
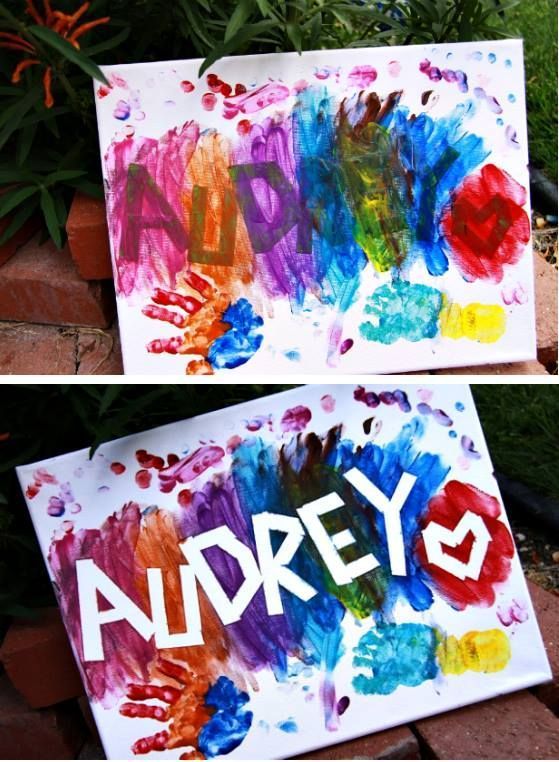
The secret behind the striking reveal in this art project is the use of tape to mask off letters. Before the children begin applying any color, an adult or helper needs to prepare the painting surface. Use painter’s tape to spell out each child’s name directly onto the blank canvas or heavy paper.
Press the tape down firmly along all the edges so paint cannot easily seep underneath. If you want to add extra visual interest, consider creating a taped shape, such as a heart or a star, alongside the letters. This preparation step creates a wonderful negative space effect once the tape is eventually peeled away.
Once the lettering and shapes are secured, the canvas is ready for the young artists to dive in. Toddlers do not need to worry about painting inside specific lines during this initial phase, which removes any frustration and keeps the process joyful.
Letting Toddlers Explore Color and Texture
Allowing children to take the lead with color application makes the activity truly engaging. Provide an assortment of paint bottles and let toddlers use brushes, sponges, or even their fingers to cover the canvas. The goal is to encourage sensory exploration and enthusiastic expression rather than a rigid outcome.
As children dab, swirl, and mix colors right over the taped letters, they experience cause and effect firsthand. Blending blue and yellow to see green, or swirling pinks and purples, turns the craft into an exciting science lesson. Children can also press their painted palms onto the bottom corners or edges of the canvas to leave their unique handprints.
Encourage them to cover as much of the white space and tape as they like. Layering different textures and paint streaks adds wonderful depth to the final background before the big reveal takes place.
The Exciting Tape Reveal and Final Touches
Waiting for the paint to dry completely is the hardest part for eager little learners. Once the surface is dry to the touch, the magic moment arrives. Carefully peeling back the masking tape reveals crisp, clean letters of the child’s name sitting underneath a vibrant rainbow of colors.
Children love seeing their names magically appear out of the colorful background. It provides a fantastic early literacy connection, helping them recognize the specific letters that spell out their identity. Teachers can reinforce this learning by pointing to each letter and sounding it out together.
To preserve the artwork for years to come, consider applying a child-safe clear sealer once everything is fully dry. These finished pieces make incredible door decorations, hallway displays, or end-of-year keepsake gifts for families.
Frequently Asked Questions
What age group is best suited for toddler handprint name art?
This project works wonderfully for children ages two through five. Younger toddlers may need more assistance with hand placement and painting, while preschoolers can handle more of the brushwork independently.
How do you prevent paint from bleeding under the tape?
Pressing the edges of the masking tape down very firmly with a fingernail or craft stick helps create a tight seal. Using slightly thicker paint rather than watery paint also reduces the chance of seepage.
Can this activity be done with large classroom groups?
Yes, but it is best managed in small rotating stations. Having one adult prep the tape in advance while another adult supervises the painting station helps keep the process organized and enjoyable.
Emphasizing process-focused art over perfection helps young children build confidence and pride in their creations. Incorporating toddler handprint name art for classroom activities offers a delightful blend of sensory play, literacy recognition, and lasting keepsake value that families will treasure.